Planing wood

How can I plane solid wood?
There are several ways to get a straight and right-angled board from rough sawn timber. The quickest way is to plane with a planer. However, these require a lot of space and make a lot of noise. With a little knowledge and practice, you can also plane solid wood with a hand plane without any electricity or noise. The machining process involves four steps:
- Dressing a board surface
- Joining a narrow side at right angles
- Planing to thickness and
- Planing to width.
Which hand planes do I need to plane wood?
Three to four different wood planes are used in traditional craftsmanship:
- Roughing plane, for fast material removal
- Roughing bench, for smoothing larger surfaces
- Finishing plane, for fine chip removal
- Plastering plane, for details
In addition to the wood planes we used to use, metal planes are becoming increasingly popular. Thanks to their slightly different design, you can get by with just two planes. For example, if you opt for a metal plane no. 62, you can use it with several planes with different bevelled bevel angles for roughing, dressing and shaping. Then add a shorter plane no. 4 for finishing and jointing. More tips on choosing a planer in our blog posts.
1 Dressing a board surface
Aim: a consistently smooth and even board face
Tools: Roughing plane and roughing bench or longer finishing plane with several plane irons
Which side to plane first?
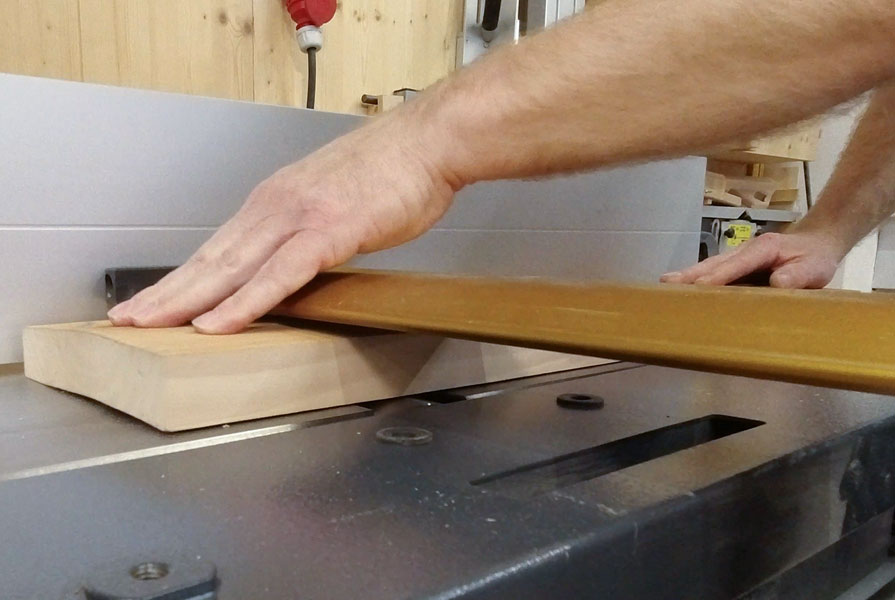
As a rule, planing is started on the right-hand side (the side of the board facing the core). The right-hand side is usually the nicer side - all further planing steps are orientated towards it. The plank is clamped firmly between the bench hooks on the planing bench. If it wobbles, you can place wedges underneath. Planing or roughing is first carried out in the direction of the saw marks (usually across or diagonally to the wood fibre) - you can easily determine these by running your hand over them. If the wood is very uneven, first use a roughing plane or a plane with a toothed iron. This produces rather short chips.
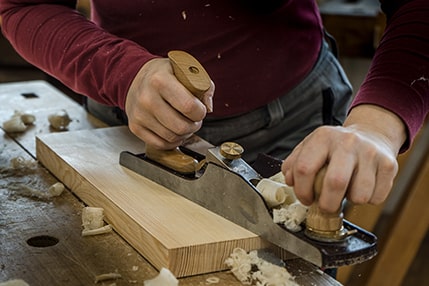
Fig.: Rough dressing with a partially diagonally guided plane
If the planks are already flat, you can also start directly with a roughening bench or a longer metal plane (e.g. No. 62, No. 7). Once all cut marks and rough fibres have been removed, the planing process is continued in the direction of the wood grain (now recognisable by the veining and tears). The raised areas are always processed. Deeper areas remain untouched. The work progress is checked by placing the longitudinal edge of the plane sole in the longitudinal and transverse direction. The aim is to achieve a continuously flat surface without warping. The finished planed side of the board is marked with an angle mark as a reference surface on the narrow side that will be joined in the next processing step.
2. joining a narrow side
Aim: a straight board edge at right angles to the surface
Tools: Rough bench or finishing plane and carpenter's square
In which direction is planed?
When joining the first narrow side, planing is always carried out in the direction of the grain. You can best recognise the grain direction by looking at the corner on the already planed surface. "With the grain" means that you plane in the direction of the rising wood fibres. The ideal tool for this is a short roughening bench or a finishing plane (e.g. No. 6). To check the squareness, a joinery angle is applied to the reference surface and the light gap between the edge and the angle tongue is checked.
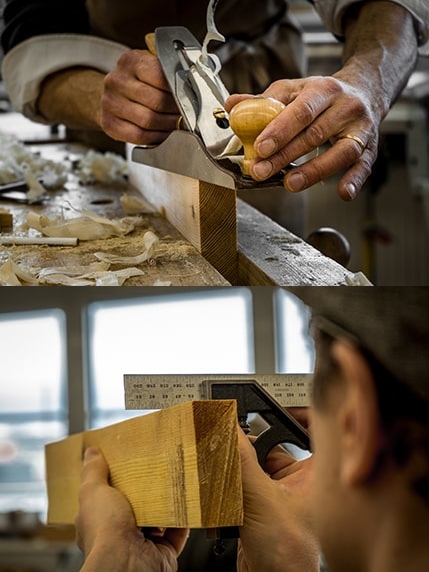
Fig.: Planer no. 4 joining the first board edge (top)
Fig.: Checking squareness with the square (bottom)
The straight line in the longitudinal direction is checked by eye or using a steel ruler. The aim is to achieve a straight edge at right angles to the reference surface. Once this has been achieved, this side of the board is also marked with an angle mark. The reference surfaces marked in this way are used in the next step to mark out the material thickness and width and later as starting points for all other measurements.
3. planing to thickness
Aim: a uniform board thickness
Tools: moulding gauge and (roughing plane), roughing bench, finishing plane
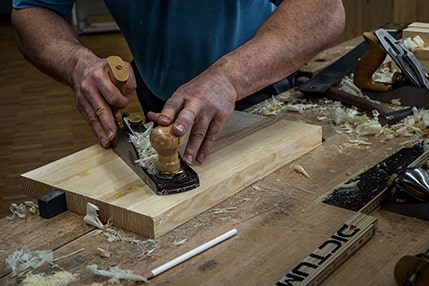
The desired material thickness is scribed all round with the moulding gauge. The method of planing is very similar to that used for levelling the first side. Here, too, the wood is first roughed and the loose wood fibres from the saw cut are removed with the planer and then the entire side of the board is gradually planed with the planer. The wood is then planed down to the desired thickness. The closer you get to the desired final size, the thinner the shavings you plane should be. The aim is to achieve a flat board side that runs parallel to the reference surface. The ideal state is achieved when the line scribed with the moulding gauge is exactly halved. More tips on precise planing to thickness in our video.
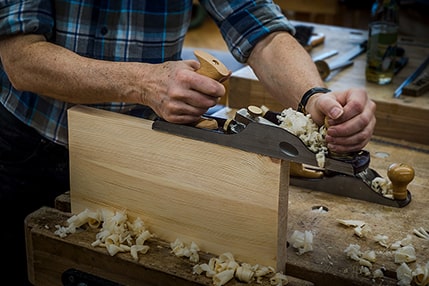
Fig.: Wood is planed down to the scribe line
4. plane to width
Goal: Parallel and right-angled narrow side to the reference edge
Tools: Rough bench, finishing or plastering plane and carpenter's square
The desired width of the board is scribed on the reference surface and the edge is planed as for the first narrow side. If the board is much too wide, the overhang can be sawn off more quickly than planing it off with the planer. However, leave enough material for subsequent planing or jointing. You now have an all-round clean and straight board that is ready for further woodworking in your project.
Fig.: The width is also precisely levelled with the planer
Like many activities in the woodworking trade, planing and jointing is a matter of practice. Gain your first experience with less expensive woods. Softwoods such as pine are more suitable for beginners than hardwoods such as oak. In the DICTUM course centres, we offer you the opportunity to train your craft skills under professional guidance in numerous workshops. One prerequisite for good results when planing is sharp planing knives or chisels. You can also learn how to sharpen planing knives, chisels and other tools correctly in our workshops.
FAQs on the subject of planing wood
What is the right and left side of a board?
For wooden planks, a log is sawn into narrow strips. Boards that come from the centre strip have vertical growth rings. All other boards (outside the centre) have more or less horizontal growth rings. The right-hand side is the side of the board that originally faced the centre or core of the trunk. The left side, on the other hand, faces outwards, towards the bark. When the wood dries after sawing, the right side becomes convex, while the left side becomes hollow(remember: the right side becomes round!).
What does jointing mean?
Wider board surfaces are assembled or glued together from several narrow strips or boards to prevent warping and warping. To ensure that the edges of the boards lie close together when gluing, they are "joined" by the carpenter, i.e. adjusted to each other with a plane. It can happen, for example, that the edges are not exactly right-angled or straight. This is not a problem as long as the glue joints are tight afterwards.
What does "bumped" mean?
Planing wood by hand is also commonly referred to as "butting", as western planes are predominantly guided away from the body with a thrusting motion. Strictly speaking, however, the carpenter means planing the end grain to length or to an angle (mitre). For this purpose, the workpiece can be placed in a planing tray or jointing position and then bevelled with a hand plane.
Can I plane wood with an electric planer?
An electric planer is ideal for adjusting wooden parts during assembly, e.g. a finishing moulding to the masonry. However, it is not suitable for planing to exact dimensions, as its material removal can only be adjusted relatively roughly.
Which is better, planing or sanding?
Planing cuts the wood fibres. The result is a very smooth surface with closed fibres. When sanding, the wood fibres are "broken" and an open-pored, somewhat rougher surface is created. Which technique is more suitable depends very much on the actual purpose of the workpiece, the type of wood used and the surface treatment. Planing is ideal for furniture that is only subject to light wear, e.g. made of fir or pine, whose surfaces are oiled. If the workpiece is more heavily used and requires a protective coating, e.g. a garden bench painted with linseed oil colours, the surfaces must be sanded and the edges broken to achieve an optimum surface treatment.