Dressing and joining with the machine
Dressing and jointing are two important work steps on the way from rough sawn timber to the finished workpiece. We will show you how to work cleanly, quickly and, above all, safely on the jointer.
What parts does a surface planer consist of?
Regardless of their size and equipment, surface planers are made up of the following parts: The drive motor, electronics, setting mechanism and the like are installed in the frame or machine stand. The machine stand is solid so that the planer has a stable stand and does not move when the workpieces are pushed along. The cutterblock with the planing knives is mounted in the centre of the frame and rotates. It performs the actual planing work and ensures chip removal. The thickness of the chip removal is set on the feed table. Its position can be adjusted in height using a lever or rotary mechanism. The take-off table is located behind the cutterhead. Its position is fixed and it is flush with the outer flight circle of the planing knives.
The parallel or jointing fence is usually at right angles to the two tables, but can also be tilted for planing chamfers or mouldings. The cutterhead cover protects against contact with the cutterhead or the rotating knives. The cutterhead must also be covered behind the jointing fence. The extraction nozzle and the extraction system connected to it should be dimensioned so that they can reliably remove large volumes of chips. The emergency stop switch must always be within easy reach when working.

What preparatory work do I do before dressing?
Dressing is only the second or third work step on the way from rough sawn timber to the finished formatted workpiece. This is preceded by wood selection and rough cutting. Once you have decided on a piece of wood, it is first cut to length and width with sufficient oversize. How much oversize needs to be added depends on how much the wood has warped or how much the dimensions in the piece of wood differ. For example, if you want to cut a wide workpiece from a "round" board, you need to calculate with more oversize than if you cut several narrow strips from it. For this reason, you should pre-size all parts before dressing and joining.

Which side should be dressed first?
When dressing, the workpiece should always be planed with the hollow side and with the grain direction. With the help of two mnemonics, you can easily determine how to plane:
"Right is round"
You can usually easily determine which side is the hollow side by placing the workpiece on the machine table. In addition, according to the rule, the "right side" is round and the "left side" is hollow. The grain direction is not always so easy to recognise.

You can usually interpret the grain on the long edges. If not, the second mnemonic helps:
"Inside the steeple it goes up, outside on the steeple roof it goes down"
Now imagine the board as a church tower. The veining points upwards towards the spire. On the inside, the wood fibre runs upwards with the grain, on the outside it runs downwards against the grain. You can easily determine where the outside and inside are by looking at the growth rings on the front side. The side facing the core, the so-called "right side", is the inside. The side facing the sapwood, the "left side", is the outside.
Working safely on the jointer: Occupational safety
In addition to personal protective equipment, hearing protection and safety goggles, the following safety measures must be observed:
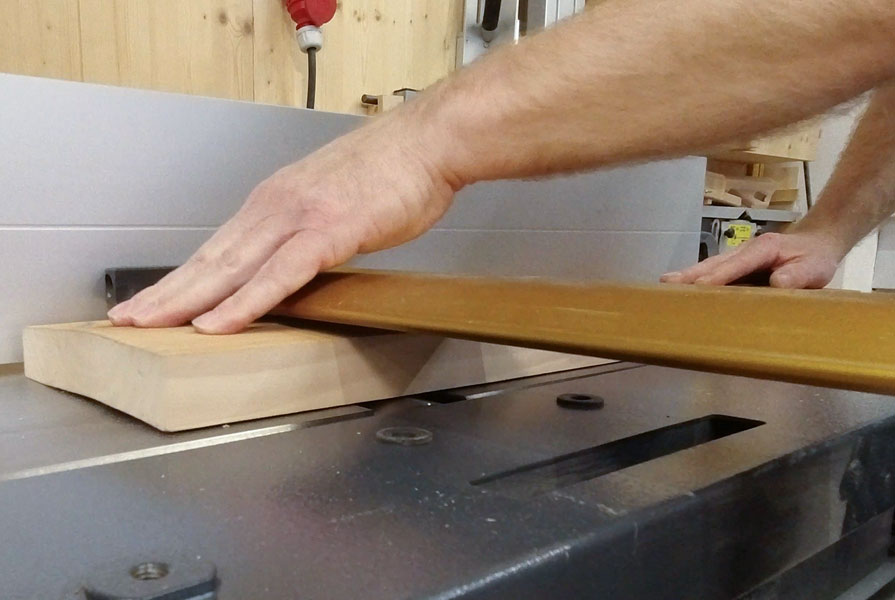
Each machine has a so-called risk area in which you are not allowed to stand. In the case of the surface planer, this is a funnel-shaped area behind the planing shaft. The machine may only be operated without a fully covered cutterhead in exceptional cases. Pay attention to your hand position! Your hands should only ever rest on the upper surface of the workpiece and, very importantly, always with closed fingers. Do not reach to the side or behind the workpiece when feeding. Even when removing the workpiece from the removal table, never reach behind the end, but only to the side. Only when a long workpiece tilts at the end of the removal table and releases the rear end can you safely reach there as well. Wood dust is harmful to health in the long term. To protect your own health, make sure you have adequate and well-functioning extraction.

How can I dress wood myself?
You can watch the exact work process in detail in our video tutorial. The first step is to set the chip removal. It should be at least 0.5 mm. If the removal thickness is less, the knives will not cut cleanly and will dull more quickly. Initially, you should not remove too much, maximum 1.5 mm. The thicker the chip removal, the greater the resistance that acts on the workpiece. Only when you are able to estimate the forces acting on the workpiece should you dare to use thicker chips.
Now guide the workpiece with the hollow side down and in the direction of the grain under the planing shaft cover or past the swivelling planing shaft cover. As soon as there is enough wood on the planing table to provide sufficient space for one hand, apply pressure to the workpiece on the planing table only. The wood is guided over the planer in several passes until a continuously planed and even surface has been created.

What must be observed when joining wood?
A longitudinal edge is now joined at right angles. To do this, the workpiece is guided upright on the rip fence over the cutterhead. The previously dressed surface lies against the jointing fence. To ensure that the surface lies cleanly, a certain amount of pressure must be applied not only downwards, but also against the fence. If possible, hands should not be placed directly over the cutter head when joining. With a machine-cut board, a few passes are usually sufficient for joining. Finally, you can check the two surfaces for squareness.