
Tine connection by hand in 10 minutes
In the 1950s, a journeyman carpenter still had to prove that he could make a dovetailed drawer by hand within an hour. There was correspondingly little time for marking out, sawing and mortising the dovetails and tenons. In this tutorial, you will learn which exercises you can use to train your manual dexterity and which work steps can be accelerated. We also provide tips on the correct choice and use of tools.
Exercises
It is important that you are able to saw freehand, i.e. without a rip, at an exact angle. The following exercises are useful for practising this:

-
Saw with scribe mark
Mark several cracks with an angle on the face and the surface facing you (long side). You can mark the cutting depth on the surfaces using a moulding rule. When sawing, half the crack should remain. Check the course of the saw cut on the opposite side with the angle. The saw cut should go exactly to the marked base on both sides - do not stop before, and never go beyond.
-
Only one cut
If your saw cuts run at an angle on both sides and stop exactly at the base, omit one of the rip cuts. For example, first omit the rip on the front side, then the rip on the long side. The rip should also be halved at this point. The saw cut tends to follow the grain. Therefore, especially when sawing without a rip on the face, make sure that the saw cut is at right angles to the edge. Here too, the results are checked with the carpenter's square.
-
Completely without a rip
If you are successful in sawing with only one scribe mark, do not use the scribing square at all and only saw by eye (if desired, mark the depth with the moulding gauge). Try to position the cuts at an even distance. Finally, check the angle, stop at the base and evenness of the spacing.
Online courses - anytime & anywhere
Score less
Tool: moulding gauge In order to be able to cut faster, only a small amount of scribing is required from now on. The workpieces are drawn together with the carpenter's triangle to define which parts belong together and how. The front and back of the drawer are given prongs, the two sides are given dovetails. The right-hand side (core side) of the boards always faces outwards. Use the moulding gauge to mark the cutting depth all round the sides (dovetails) and only on the surfaces of the front and back (prongs).
Sawing in a double pack
Tool: Tine saw or Dozuki Start sawing at the dovetail parts, as the tines can be easily transferred later. You can also clamp the drawer sides, which have both dovetails, together and saw them in one operation.
Tine division by eye
The tine division is not scribed, but sawn directly. To do this, first saw the two outer tines by eye. Depending on how many dovetails you want, divide the distance from the outer edge to the opposite dovetail into equal parts. You then only need to saw in the missing cuts for the dovetails. The outer dovetails are placed directly on the base.

Sawing instead of chiselling
Tool: Fretsaw The gaps are cut out with a fretsaw just above the base. A fretsaw with a saw blade that can be rotated is ideal for this (e.g. from Knew Concepts, no. 712556). The saw blade is clamped rotated by 45°. The saw can then be easily inserted into the existing saw cut, tilted by 90° and then roughly cut out the waste horizontally. Leave 1 to 2 mm above the ground.

Efficient chiselling
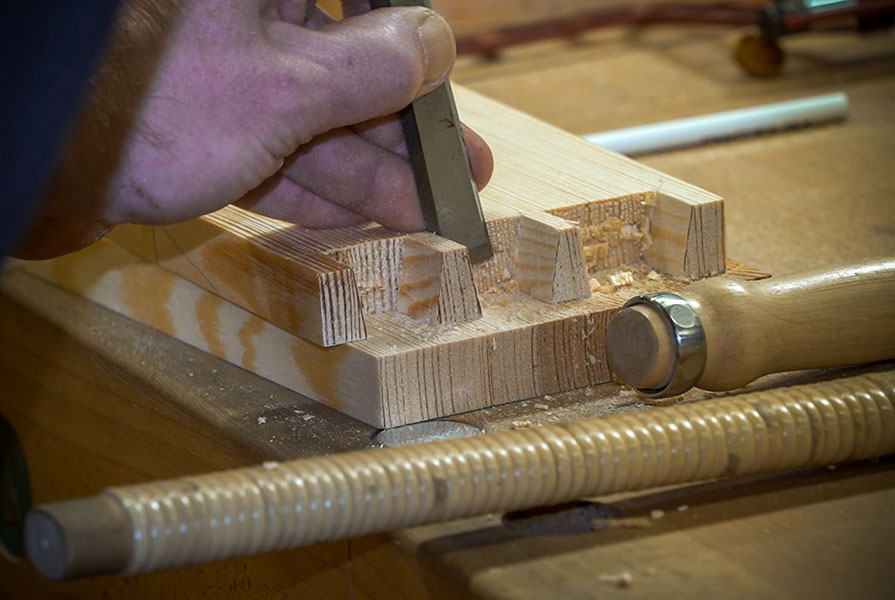
Tool: chisel & mallet/hammer The remaining residue is chiselled out. If there is only 1 to 2 mm remaining, the chisel can be placed directly in the crack and chiselled to the centre. If there is more wood above the base, chiselling is done in two to three steps. Finally, clean out the corners properly.
Transfer tines
Tool: Pencil The dovetails made in this way are now used to mark out the tines. To do this, clamp the appropriate tine part (observe the carpenter's triangle) vertically and place the corresponding side part with the dovetails on top. To bring the tine part and dovetail part to the same level, you can, for example, place a plane underneath to the side so that the dovetail piece rests at an angle. Transfer with a sharp pencil.

Sawing the tines
Tools: Tine saw/Dozuki and fretsaw As we have transferred the cracks from the dovetails, the resulting pencil line runs next to the dovetails - i.e. inside the tines. For this reason, the cracks remain completely in the following saw cuts (do not saw on half the crack). First, all cuts are sawn in one direction, then in the other. This has the advantage that you do not have to constantly change your posture. The waste is roughly sawn out again with the fretsaw.
Chiselling out the prong base
Tool: Chisel & mallet/hammerNow just chisel out the base of the tine cleanly. Start on the inside of the workpiece and simply chisel straight down to the centre. From the outside, chisel the tine at a slight angle. Finally, clean out the corners properly. You can now plug the tine connection together.


