
Build your own Christmas tree stand
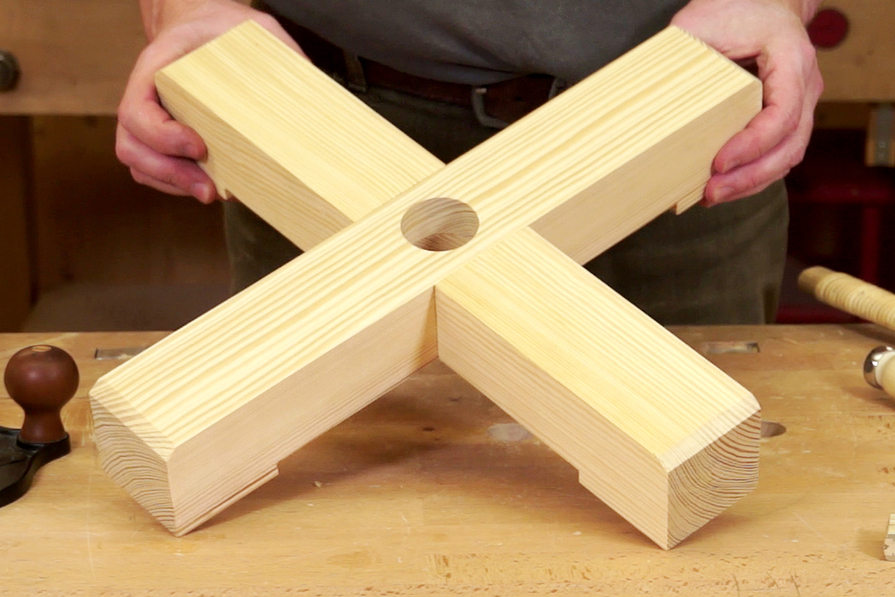
In this guide, we show you how to build your own Christmas tree stand using a traditional wooden joint and a few hand tools.
Tools needed
- Handsaw (e.g. Dozuki universal, Kataba crosscut, shoulder saw)
- Chisel and mallet
- Basic plane
- Bench plane (e.g. Planer No. 4)
- Drill and Forstner bit Ø 40 to 50 mm
Materials
- 2 frames (pine, beech or similar) 70 x 70 mm, 450 mm long (optional wedges for wedging the tree)
The dimensions of the Christmas tree stand given in the construction plan are designed for a small tree. If you want to set up a larger tree, you should vary the construction plan according to the proportions.

Correct marking
For the top of the Christmas tree stand, use the most attractive side of the frame parts and mark these. Next, scribe the depth of the overlap on both parts from the top so that the workpieces can then be notched.
We recommend using a moulding rule with a cutting wheel to scribe the depth. The cuts created during marking are perfect as insertion points for the chisel and saw. Now clearly mark all areas that are to be notched as waste. Otherwise, it can quickly happen that you saw on the wrong side of the crack.

Saw cut
Here is a section of text. A picture is inserted on the right. Lorem ipsum dolor sit amet, consetetur sadipscing elitr, sed diam nonumy eirmod tempor invidunt ut labore et dolore magna aliquyam erat, sed diam voluptua. At vero eos et accusam et justo duo dolores et ea rebum. Stet clita kasd gubergren, no sea takimata sanctus est Lorem ipsum dolor sit amet. Lorem ipsum dolor sit amet, consetetur sadipscing elitr, sed diam nonumy eirmod tempor invidunt ut labore et dolore magna aliquyam erat, sed diam voluptua. At vero eos et accusam et justo duo dolores et ea rebum. Stet clita kasd gubergren, no sea takimata sanctus est Lorem ipsum dolor sit amet.

Notching the feet
Roughly prise out the material between the feet with powerful blows. It is important that you leave the bars for placing the base plane. Chisel out the material until only 1 mm of wood remains above the crack.

Smoothing with the planer
If you have a planer with a depth stop, set this to a final depth of 10 mm. Do not start with the final depth, as a base plane does not have a clamping breaker and removes fine chips in several passes. Work with the base plane from the outside inwards.
This avoids possible tears. Guide the planer in short, curved movements. The planer should lie cleanly on both sides if possible. In the final step, only fine shavings are removed to achieve a clean surface.
Once the lower surfaces of the Christmas tree stand have been smoothed, you can prise away the support bars. Then carefully work this side with a chisel or a small plane to obtain a continuous surface. Repeat the same steps on the other part of the Christmas tree stand.

Notching the overlap
When notching the joint, also cut off material quickly with powerful blows.
Here, too, you should leave 1 mm of material above the crack, which you then remove with the planer.
Then proceed step by step with the planer until you only need to remove fine chips. Repeat the process on the counterpart.

Fitting the connection
Place the individual parts of the Christmas tree stand on top of each other to check the accuracy of fit. Make sure that you do not press the workpieces together with force. Although this works with soft wood, it will result in unsightly pressure marks. The best way to ensure a perfect fit is to clean the sides of the workpieces with a bench plane. This also removes all cracks and marks and results in a smooth surface.

Chamfering the edge correctly
To ensure that the stand for your Christmas tree retains its beauty for a long time, it is best to bevel the edges. For the top sides, plane an approx. 8 mm bevel on the outer edges. To make the bevel even, mark the bevel with a moulding knife.
To avoid tears, clamp a piece of splintered wood against the workpieces. Alternatively, you can use a chisel or marking knife to join the cracks in the moulding where the fibres have already been cut through.
The feet are bevelled all around by approx. 2 mm. Bevel the other edges only minimally.

Drill the opening for the Christmas tree
Join the two diagonals of the overpanel together and mark the centre. Drill the opening for the Christmas tree here using a 40 to 50 mm Forstner bit. Make sure that no shavings block the hole and that the drill runs hot. Once you have reached the centre, turn the stand over once and drill through from the underside. And the stand for your Christmas tree is ready!


