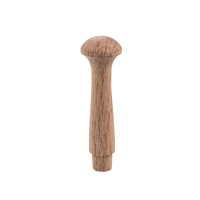
Looking for an unusual furniture handle for your home-made cabinet? Or would you like to embellish the plain drawers of an old chest of drawers with beautiful furniture knobs? Have you ever thought about using instrument pegs? Violin or cello pegs are usually elaborately crafted from high-quality ebony. Their design is classic, simple and elegant and they come in different shapes and sizes. Here you can find out what you need to consider when making your own furniture handles from instrument pegs.
Simple furniture handles
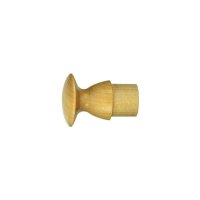
Traditional wooden furniture knobs, such as Shaker knobs, are usually hand-turned and are relatively simple in style (simplicity is typical of the Shaker style). They are quite easy to work with. These furniture knobs have a straight shaft with a consistent diameter and are simply glued into a suitable hole. When using instrument pegs, however, there are a few things to bear in mind.

Contrast: simple Shaker knobs and ornate pegs made of ebony
Using instrument pegs as furniture knobs
The intended use of instrument pegs is to tighten the strings and thus tune an instrument. For this, there needs to be enough friction between peg and hole, while still allowing the peg to be turned with precision. This is achieved by using high quality materials (exotic woods) and a slightly tapered shaft. When adapting a peg to serve as a furniture handle, you can make use of the tapered shape by driving a wedge into the peg.
1. Choosing pegs
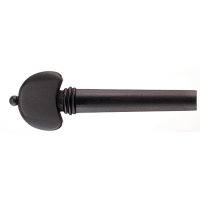
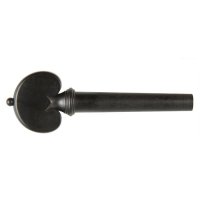
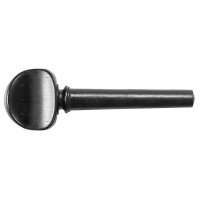
Select pegs of a suitable shape and size. There are, for example, decorative heart-shaped pegsheart-shaped pegs, the classic English models or system pegs, which are a little plainer. There are also different sizes of pegs for violin, viola and cello. Some models are elaborately decorated with brass pins or inlays.
2. Determining the drilling diameter
In instrument making, a conical reamer (e.g. a Herdim peg reamer) is used to adjust the holes to precisely fit the pegs. However, as the pegs are glued when used as furniture handles, you can just drill a straight hole of suitable diameter. Measure the diameter of the peg at its widest point, just below the peg handle. Make sure that the diameter of the peg and the drill are within 0.5 mm of each other (e.g. peg Ø 9.2 mm and drill Ø 9.0 mm).
3. Marking the position of the furniture handle
Mark the exact position of the furniture handle. Make sure that the knobs are aligned, especially if there are several drawers one above the other or two doors next to each other.
4. Drilling
You are now ready to drill the holes for the pegs. We recommend using a pillar drill or drill stand to ensure the handles sit straight.
5. Shortening the length of the pegs
Instrument pegs are usually much too long (e.g. violin pegs have a 45 mm shaft). Insert the peg into the hole, mark the length adding a 2 mm allowance and saw off to the required length.
6. Make an incision in the peg
In order to insert a wedge into the peg, you need to cut a slot into the shaft. There are two things you need to know. Firstly: The wedge should be aligned perpendicular to the wood grain, to prevent the pressure from splitting the workpiece. Secondly: The shaft slot must not go all the way to the handle. Instead, the slot ends 5 mm short of the handle, to prevent the wedge from splitting completely.

The wedge in the shaft must apply its outward force in the direction of the wood grain, so that it does not split the workpiece
7. Cutting wedges
Cut a small, flat wedge from a piece of hardwood. If you use a light wood for the wedge, you can use it to emphasise the craftsmanship of your work.
8. Glueing and wedging the furniture handle
Before fitting the peg, sand and clean the area around the hole. Apply a small amount of glue to the peg and into the hole. Insert the peg all the way into the hole. Apply a small amount of glue to the wedge as well, then carefully hammer it into the slot. Keep checking the position and alignment of the pin. It can easily twist and slip out while the wedge is being driven in.
9. Trimming the excess length
After the glue has dried, you can carefully trim the protruding shaft on the inside of the workpiece with a wide chisel or saw it off flush. This works best with a fine-toothed flush-cutting saw (e.g. Ryoba Restauro). To finish off, finely sand the inside once more.
Special features of old furniture
On old furniture, the door handles and drawer knobs are often missing or damaged. This is an opportunity to enhance plain drawers and simple doors by using instrument pegs as handles. As the furniture is usually still assembled (disassembling is very time-consuming and only worthwhile in the case of elaborate restorations), it is not so easy to position it on the drill press. In addition, the original hole of the furniture knob often makes it difficult to drill a new hole. If this is the case, make a simple drilling template. To do this, draw a cross on a wooden block, so you can align the template exactly with the workpiece. Then drill a vertical hole in the block with a pillar drill.
 A simple drilling template allows you to drill accurately into the finished drawer
Using this simple drilling template, you can then easily drill out an existing hole at the correct angle. Alternatively, on some pieces of furniture, you can attach new front panels to the old drawers to give the piece a completely new look.