Functional concept
The basic construction is an inner box glued between the sides (fixed elements). For the four movable side elements, fit the runners in the sides of the basic structure. The movable sides are each made up of three layers. The middle layer is somewhat narrower, so that it creates a groove in which the runners can slide. The ends of the sides are stepped. The stepping is arranged in such a way that there is only enough space in one corner so that the neighbouring side can be shifted by one material thickness. This makes enough space for the next side so that this can also be moved by one material thickness. This is done three times in a row until the lid can finally be opened. In our example, this results in ten steps.

An inner box glued between two sides with runners, surrounded by four movable sides
As a further special feature, we have built a notch into the first side so that the side does not move by itself or by gravity and thus already “gives itself away”. We also built in a small catch on the lid so that it doesn't fall out unintentionally.

The left side can be moved down by one material thickness and makes room for the lid
Material
As material for the first attempt, we recommend to use thin plywood of three to five millimetres thickness. It is less hard-working than solid wood, and you can familiarize yourself with the functional principle at low cost. Since precision is important, it is best to cut with a circular bench saw. However, you can also cut roughly by hand and then trim it to the exact size with a jointer fence For the runners, plane a solid wood board a little thicker than the material thickness.
Tools and aids
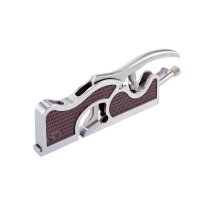
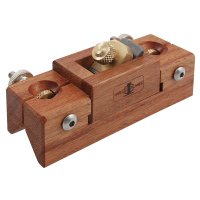
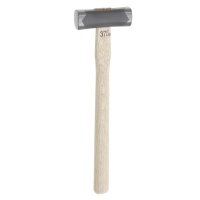
To build the Japanese puzzle box, you need a saw to cut the runners to length, a jointer fence to plane the sides to fit exactly, a planelade to plane the runners to thickness with a plane that fits into the planelade and possibly a shoulder plane to fit the sides. You will also need a narrow chisel and a hammer to set the notched stops.
We also built ourselves a glue board. This consists of a worktop, approx. 300 × 400 mm in size, with a glued-on batten as a stop. Together with several gluing templates made from narrow strips of the board material used, this board makes it easier to glue the sides together with a perfect fit. Finally, you require a way to clamp the board after gluing, e.g., weights or extensions and clamps.

The MDF planelade is adjusted to the exact thickness of the runners by means of allowances in different thicknesses.
Cutting
We have created an Excel table to create the cutting list. Enter the outer dimensions and the material thickness in the cells with a yellow background. Not only is the cutting list created, but you can also read off the size of the inner box from the table, so that you know what will fit into the puzzle box later.
Building the puzzle box
First prepare all the parts using the cutting list. Then you can already start gluing the movable side. To achieve the exact offset, use the stop of the gluing board and two board sections. When clamping the sides, make sure that the parts do not move against each other.
Next we take care of the runners. They should be a touch thinner than the grooves in the moving sides. Therefore, first saw the battens a little thicker and then plane them to exactly the right thickness with a planelade. To do this, proceed as described below: Join a long edge of the board that is intended for the runners. Mark this edge. Saw off a first batten with a circular saw, band saw or hand saw, slightly wider than needed. Repeat the joining, marking, and sawing until enough lasts have been sawn off.

Glue board and board cuttings facilitate the exact alignment of the parts
Extensions of different thicknesses can be used to set up the planelade to exactly the right thickness. The battens should run smoothly in the grooves in the sides. You can test this on a glued side. After cutting to length (dimensions according to the cutting list), glue the battens onto the two fixed sides. To align the batten exactly, we make a gluing template from strips of board. The battens must start at the ends with a distance of three material thicknesses and be one material thickness away from the parallel board edge. With the gluing board and this template, gluing on the runners is quite easy. Since the last batten on each side is the one that was glued on first, we can only use the thickness of the gluing template for it and have to mark the distance to the face. Important: the arrangement of the runners on both sides must be mirrored!
To glue the inner box, the bottom edges of the side pieces and the bottom are mitre-jointed and blunt-glued. Before gluing, check the length of the sides so that there is enough space to move the sides. After the glue has dried, plaster the inner box and glued to one of the sides centrally between the runners. After a short drying time, glue the second side to the inner box and clamp everything together to harden. When the glue has set well, you can fit the sides so that they run well in the carcase. To do this, slide the sides onto the corresponding runners. If this is not possible, or only possible with difficulty, you can remove one or two planing joints from the long edges with the jointer fence. Then check that the opening mechanism works. Sometimes it is necessary to plane the stepping of the movable side parts a little with a moulding plane.

When gluing, both side pieces must be aligned exactly level.
For the latching stops, mark the first side and the lid at the appropriate places. Pre-drill holes and chisel them out squarely so that you can glue in a piece of the runner material. You also need to make a recess on the inside box for the notch. Mark the spot and work a recess (see drawing) so that the stop can snap into place. When the glueing of the wooden pieces for the stops is firm, they can be shortened to the exact size. To do this, it is best to chisel off the end faces in a roof shape and slowly work your way towards it in small steps until the notch works. If you chisel away too much, a new block must be glued in.

When closed, the latching mechanism locks the left side and prevents it from falling out when open.
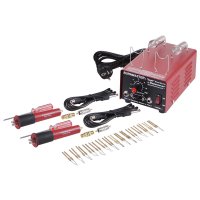
Decorations and surface treatment
To hide which side has to be moved first, many Japanese puzzle boxes have very finely patterned wooden overlays. You can paint a corresponding pattern on the box or burn it into the surface with a branding tool. A good effect is created by adding small circumferential V-joints. You can apply these with a so-called scratch stick (also called a scratching stick or profile scraper). A scratch stick is an angle made of wood in which a blade-like cutting edge, in this case V-shaped, is clamped. This V-shaped tip is then used to cut small grooves in all sides all around, at intervals of one material thickness. This makes it difficult to see which of the sides protrudes at either end and can be moved first. A similar effect is achieved if all the edges of the crate are evenly chamfered with a thickness of material.

Clever ornamentation makes the first side hard to find
Finally, the crate can be oiled or varnished. A little soap or wax applied to the runners makes it easier to move the sides. However, you are free to decide for yourself whether you want to make it easier for the gift recipient.