The Mitsu-Kude connection
If you do a little research, you will find three variants for the design of the connection. One with three different parts, and two variants where only two different parts are used. The middle layer is the same in all of them. The first variant, with three different parts, can be implemented easily in machine production.

Variant 1 with three different parts

Variant 2 with only two different parts

Variant 3 leaves a small cavity that is not filled
If the joints are sawn manually, the two variants in which only two different parts are made are easier to implement. The difference between the two variants is that in the third variant, cavities remain in the joint after it has been put together. With the Kumiko, with their rather small diameters, this does not matter so much. For our Advent calendar, however, the second variant is more suitable for making manually.
Material calculation
We need a total of 15 battens for the star: 6 short ones with three incisions for the connection, 6 medium ones with four incisions each and three long battens with five incisions each. It is advisable to prepare the material in such a way that one short and one medium batten can be cut from one board. Accordingly, we need nine boards that are all the same length, about eight times the grid length. All the battens are first butted twice at 60° at both ends.
Making the joints by hand
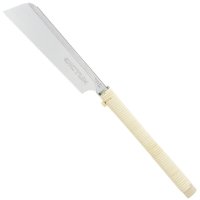
To make the joints by hand, you need a few tools in addition to the usual tools for sawing and chiseling.
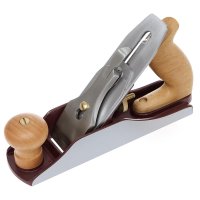
To join the ends of the individual parts in a roof shape, you will need a jointing fence with a 30° stop. If you want to plane out the cross-section of the battens by hand, in our example 60 × 8 mm, you will also need a planer for the thickness. In the area between the battens, screw in allowances of different thicknesses to adjust the thickness. The boards, which have previously been sawn a little thicker, are planed in these from both sides until the planer takes nothing more away.
To saw in the joints, the pieces have to be clamped together. For this purpose, we built a holding device from 19 mm multiplex.

You can build such a planer yourself from leftover MDF.
Scribing. First, clamp all the parts together in the holding device. The two outer parts have a centre crack on the narrow edge, and all parts butt against the left stop. Using two compasses, one for the lateral projection of the battens and one for the grid dimension, we divide the battens into six sections. Using the compasses guarantees that all the distances are the same. There must be seven incisions (6 units = 7 marks). The incisions are then scribed with the bevel set exactly at 60°. We now apply angular scribes to the two outer battens because the incisions must be exactly angular.

A holding device is indispensable for sawing the Kumiko joints.
Sawing. As a guide, you can mark the depths (1/3, 1/2 and 2/3) on the saw blade with a foil pen. First, saw all the marks to 1/3 of the depth (20 mm in the example). Then turn the three battens that are needed for the middle layer over and clamp them between the other battens again. Using the existing saw cuts as a guide, the middle sections are now also sawn 20 mm deep on the other side. The middle parts are now finished and can be removed from the stack.

In the holding device, all the battens are sawn together.
Clamp the remaining parts firmly together again. These are now further sawn to a depth of 40 mm. Then move the parts to the right stop of the holding device and scribe the 60° slope in the other direction. Orientate yourself here on the incisions and the centre cracks on the two outer battens. Angle cracks are again made on the outer sides. Now saw in this direction up to the middle (30 mm deep). The incisions are now all made.
Finishing with the circular saw
With the circular saw you can make the first version of the Mitsu-Kude joint with three different parts relatively quickly. To accomplish this, you need a circular saw with an angle fence that can be set to 60° and 120°. You will also need two auxiliary fences with inserts in the thickness of the saw blade.

Circular saw with auxiliary fences
Build auxiliary fences. Set the angle fence of the saw to 60° and saw a notch in the material for the first auxiliary fence. Then glue a small batten into it in the thickness of the saw cut. Make a second fence for the 120° setting in the same way. Attach the auxiliary fences to the saw's angle fence with adhesive tape on both sides. Attach the stops so that the distance between the batten in the auxiliary stop and the saw blade corresponds to the grid dimension of the Kumiko grid. You also need a spacer block whose thickness corresponds to the material thickness minus the saw blade thickness.
Preparations. Prepare the material again so that you can saw a short and a middle piece from one batten. One end of each batten should be trimmed or sawn into a roof shape. Prepare a few more battens so that you have a few test pieces to adjust the fences.
Saw on the machine. Set the depth of cut to 1/3 (20 mm) and saw the centre pieces. To accomplish this, place the batten against the insert in the auxiliary fence and make the first cut. This is now placed over the insert in the auxiliary fence and the next cut is made. This is repeated until all cuts are made. Then the batten is again placed against the auxiliary fence, but this time with the spacer block, and the second cut is sawn offset by the thickness of the material. This is also reproduced over the entire length of the workpiece. Now turn the batten over and also saw 1/3 deep on the other side. This means that the middle parts are already sawn.
Set the depth of cut to 1/3 (20 mm) and saw the centre pieces. To accomplish this, place the batten against the insert in the auxiliary fence and make the first cut. This is now placed over the insert in the auxiliary fence and the next cut is made. This is repeated until all cuts are made. Then the batten is again placed against the auxiliary fence, but this time with the spacer block, and the second cut is sawn offset by the thickness of the material. This is also reproduced over the entire length of the workpiece. Now turn the batten over and also saw 1/3 deep on the other side. This means that the middle parts are already sawn.
To make the first joint with three different pieces, three battens are now sawn for the top layer with 2/3 depth (40 mm). Then reduce the cutting depth to 1/3 (20 mm) and saw in the battens for the bottom layer.
Assembly
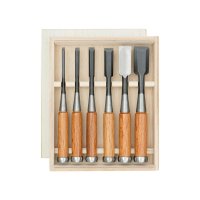
Chisel out and clean. Mark the bottom of each overleaf (1/3, 1/2 and 2/3) with the marking gauge and then chisel and clean out.
Cut to length and join. After cutting to length, the ends of all the battens are trimmed to form a roof. Now you can put the star together.
Ideas for the Advent calendar
Surface. The finishing of the surface is up to you. We have stained the parts with four incisions dark so that a star is formed in the hexagon. All the pieces were then treated with hard oil.
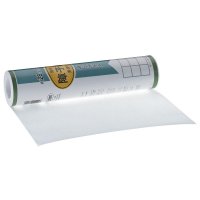
Backing board. For the backing board, we covered the star in the classic way with shoji paper. To achieve this, the glued surfaces are coated with rice paste and the paper is put on and smoothed down. After the paste has dried, the whole surface can be sprayed with clean water. This tightens the paper as it dries and smoothes out any wrinkles. You can also cut a thin sheet of plywood as a backing board.

Lovingly decorated, the Kumiko star becomes an Advent calendar
Doors. For the doors, we sawed triangles out of thin plywood with a little oversize. You can now fit the doors exactly in the butt drawer with a horizontal 30° stop. If you like, you can also close the back of the Advent calendar this way. We have used Japanese wooden nails as handles. These nails are conical. After drilling with a depth stop on the drill, the nails are glued in with a drop of glue. On the inside, the nail is then cut flush to the surface and plastered.
Numbers and decoration. The numbers can be painted on with coloured pencils or burned in with a pyrography tool. If you want to use paint pens, the wood must be sealed beforehand. You can also buy ready-made numbers to stick on in stationery shops and craft supplies.
For a grid or star with Kumiko joints, you have to work very precisely. You can use the techniques shown for the Mitsu-Kude connection for other projects as well. Once you have a handle on working accurately by hand or adjusting the machine, there's nothing standing in the way of your new Advent calendar. Filled with nice little things or treats, the Kumiko Advent Calendar is a nice surprise for a loved one.
And the best thing is that it can be filled again next year.
Have fun making it and enjoy the Advent season!