David Charlesworth was a great teacher in furniture making. He was perhaps not quite as well-known as James Krenov, for example, but his famous »ruler trick« is familiar to most of us. Sadly, he passed away at the end of May 2022 after a long and serious illness. In his honour, I would like to show you a technique that is less well-known but at least as ingenious as his ruler trick.
I had the pleasure of meeting David in person at his last course in Germany in 2011. Never before or since have I met a craftsman who worked with comparable meticulousness and precision. He taught this highly precise working method in his courses with a lot of patience.
The course I attended was called »More than sharpening«. He taught us not only how to sharpen and »tune« our tools, but also how to plane rough sawn timber to a few hundredths of a millimetre and then how to do the opposite edge of the board with the same accuracy. Finally, we joined the two long edges at an angle.
I would like to show you this technique today, as many of the principles and techniques used apply to planing in general. Handmade glued joint boards for table tops or door panels look much nicer than a machine-joined joint.
Planing perfectly straight board edges by hand
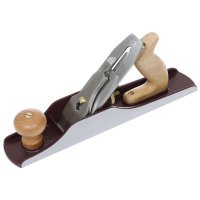
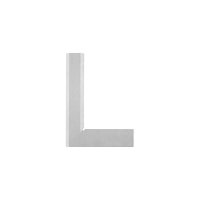
The following tools we need for this are not necessarily available in every wood workshop: You will need a good straightedge or ruler, for example the Precision Knife Edge Ruler and a very precise square such as the small Starrett Compact Combination Square. Furthermore, a good metal plane (e.g. the Jack Plane No. 5). David Charlesworth's favourite plane was a No. 5 or 5 1/2. The No. 5 has the ideal length for perfectly planing boards up to 50 cm long. For longer boards, you will need a longer plane, for example a No. 6, No. 7 or even the No. 8. You also need two boards to be joined. They should already be perfectly levelled (planed) on at least one surface.

Measure the chip thickness with a micrometer
The plane blade must not be ground straight for this technique but should be slightly rounded (approx. 0.05 mm). This allows three different chips to be removed, depending on how the plane is positioned in relation to the edge of the board. If the plane is centred over the edge, an evenly thick chip is taken off. If the centre of the plane is passed over the right edge of the board, a wedge-shaped chip is removed with the right side of the chip being thicker. If you guide the plane over the left edge, the left side of the chip is thicker.
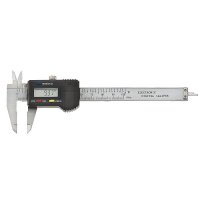
The plane should be adjusted so that it takes off about five hundredths of a millimetre in the centre. You can determine the thickness of the chip with a Micrometer or Digital Callipers.
The sole geometry of a hand plane results in one edge becoming convex if continuous chips are taken off. So how is it possible to create an almost perfectly straight edge?

Due to the »rounded« shape, the chips removed are thinner at the edges
David Charlesworth's idea is to prevent removing continuous chips by doing »stop cuts«. Chip removal begins shortly after the front end of the board and ends shortly before the other end of the board. If you now make such stop cuts until the plane does not remove any more material, the result will be a minimally hollowed board edge. The depth of this hollow is determined by the plane length and the chip thickness (protrusion of the blade from the sole). A short plane therefore produces a deeper hollow than a long one. Therefore, the length of the plane must suit the length of the workpiece. In our case, the hollow is about five hundredths of a millimetre. You can measure it with a ruler and a piece of paper used as a feeler gauge. Cigarette paper is approx. 4 hundredths (0.04 mm) thick, 80 g copy paper approx. 10 hundredths, i.e. one tenth of a millimetre. The cigarette paper slips through at the middle of the ruler, the copy paper does not. Afterwards, make one or two continuous planing passes to remove the planing marks at the beginning and end of the board. This creates an almost perfectly straight edge.
Joining board edges with the hand plane
Now the edge can still be twisted and not at right angles to the surface. Check the angularity at several points along the entire length of the edge. Use a good carpenter's square or an even more accurate knife edge square. However, we do not place the short leg on the surface and sight the edge as usual, instead we press the short leg onto the edge and sight the surface! This multiplies the angular error caused by the long leg on the surface, so to speak, and makes it more visible.

These inaccuracies are more visible on the long leg

Coding of angularity according to David Charlesworth
David Charlesworth used a very specific system to mark the angularity. If a corner was too high, he made a short line across it, if it was much too high, two lines. If the edge was angled at the measured point, he drew a line across the entire edge.
With these marks as a guide, he began to remove continuous chips. If there was a line at the right corner, he moved the plane to the right. If a line ran along the entire edge, he centred the plane. If the left corner bore a mark, he planed to the left. If there were two lines at a corner, he passed over this corner twice. The plane was thus only centred in the places that did not need correction.

Guided by the markings, the plane leaves the centre axis

The precisely planed joint is barely visible
If the angularity is correct over the entire length, use a ruler to check again whether the edge is really straight and correct it using stop cuts if necessary. As a small additional test, place the two boards to be glued on top of each other and let them tilt. If the boards rest on top of each other after a few pendulum movements, then the joint fits together well. If the boards swing longer, we can still improve the fit.
I hope that many more generations of wood enthusiasts can learn from David Charlesworth's ideas and methods. I personally owe him a lot! Peter Lanz, DICTUM Workshop Centre Munich.