When chisels or plane blades are not sharpened at the correct bevel angle or if the blade is not absolutely square after sharpening, it’s almost impossible to work effectively with them. If a sharpening guide or machine was used for sharpening, the most common cause of unsatisfactory results is incorrect settings. The DICTUM Sharpening Buddy assists you in checking and adjusting the individual settings for each tool. Here you can find out how the Sharpening Buddy helps you sharpen chisels and plane blades.
How to determine and check the bevel angle?
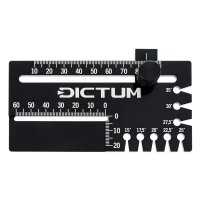
To resharpen a tool blade correctly, you must first know the angle at which the bevel was ground. Common bevel angles for chisels and plane blades typically range between 25° and 35°. To check the bevel angle, the Sharpening Buddy features eight different angle gauges (15/17.5/20/22.5/25/27.5/30/35 degrees) that allow you to easily measure the tool cutting edge. The cut-out at the tip of the angle gauges prevents the cutting edge from coming into contact with the Sharpening Buddy, to avoid any potential damage to the blade.

Measuring the bevel angle in the angle gauges
If the bevel angle is shallower than that of the gauge, the edge won’t sit correctly against the outer part of the gauge. If the angle is steeper, it won't fully align with the inside of the angle gauge. In both cases, you can move the blade up and down in the gauge, since there is some play. When the bevel and back neatly fit inside the angle gauge, there should be no noticeable play and it cannot be moved about. Holding the Sharpening Buddy against a light source while checking will help you spot any deviations.

Angle too shallow, angle too steep, and the correct angle (illustration exaggerated)
Note: To protect the cutting edges, the Sharpening Buddy is made of aluminium, which is softer than tool steel. When checking the bevel angle, just gently move the chisel or plane blade up and down. Excessive wiggling with too much pressure can cause the angle gauges to deform.
How to set up a sharpening jig
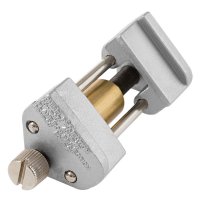
Once you have determined the correct bevel angle for your tool, you can adjust the sharpening guide accordingly. For some sharpening guides like the Veritas Sharpening System II, setting gauges are included. These are adjusted based on the degree measurement. For simple sharpening guides like the Double Jaw Honing Guide, the Sharpening Buddy comes in handy. Follow these steps:
- Loosely secure the blade in the sharpening guide.
- Place the jig with the blade on a flat surface (sharpening stone).
- Align the blade in the sharpening guide so that its bevel sits completely flat on the surface. You can also colour the bevel with a permanent marker and make a few grinding strokes on the stone to see if the entire bevel is making contact and is being worked.
- Fix the blade in this position within the sharpening guide.

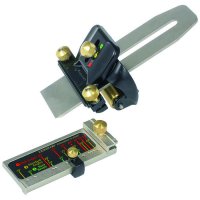
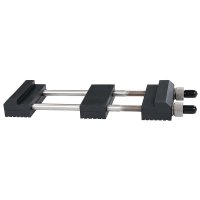
Carefully slide the Sharpening Buddy's stop against the cutting edge
- Now you can check the blade protrusion with the Sharpening Buddy. To do this, place the blade on the unprinted side of the Sharpening Buddy. The edge of the Sharpening Buddy will touch the front edge of the sharpening guide.
- Now, slide the stop on the Sharpening Buddy against the cutting edge and secure it with the knurled screw.
- Turn the Sharpening Buddy over. You can now read off the blade protrusion in millimetres on the scale. Make a note of this value for future sharpening work.

You can note the value on the scale for future sharpening tasks
Tip: Record the determined measurements directly on the tool, for example by attaching a small label. This way, you won't have to search for them when it's time to sharpen your tool again.
How to verify if the blade was ground square
An obliquely ground plane blade makes it impossible to set the lateral position. The blade takes off thicker chips on one side than on the other. Some plane blades are intentionally slightly rounded. For example, smoothing plane blades have the corners ground off to avoid leaving tracks while planing surfaces. However, this rounding is minimal and often hardly visible to the naked eye.

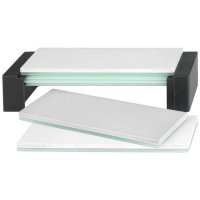
The light gap clearly shows that this iron was slightly rounded during sharpening.
The DICTUM Sharpening Buddy includes a square check with a light slit to verify the squareness and detect any rounding on the blade. Place the blade with its back against the large contact surface and align its edge against the right-hand ledge. Then slowly slide the blade forward to the verification ledge. Now, hold everything against a light source. Using the light gap method, you can determine whether the tool was ground square or if it's a rounded smoothing plane blade.
The square check also provides two additional values: the tool width and the width of the bevel. You can also note these values for future sharpening tasks.