On Instagram and YouTube, I recently encountered several saw holder designs in which the saws are secured by round rods running through a sort of funnel. I appreciated the concept and was curious if it could be applied to Japanese saws with their incredibly thin saw blades, and whether this design could be improved.
It’s worth noting that there are numerous methods to conveniently mount your saws on the workshop wall. The saw holders mentioned below serve as examples and are open to adaptation.
The basic principle of saw holders
In the videos on the internet, the principle is always the same: A roller (round wood, dowel rod, or metal pipe) is placed between two funnel-shaped surfaces, or one surface is slightly inclined while the other is vertical. The saw blade is guided with a slight upward movement between the roller and the flat surface. Due to its own weight, the saw blade is pressed by the roller against the vertical surface. This works surprisingly well.

The roller presses the saw blade against the vertical bar
What needs to be considered in the original design?
The following points immediately stood out to me in this design: If the roller has a small diameter, the saw quickly twisted or tilted it up and then it no longer works. Solution: the diameter of the roller should be slightly larger than its length, then it can no longer stand up (e.g. roller length 40 mm, roller diameter 50 mm).
The construction only works with a cover, otherwise the roller falls out. This limits the thickness of the tool to a fixed dimension, for example 5 mm, even if wider items could actually be clamped.
Some people use metal rollers because they are heavier. However, this does not significantly alter the clamping force – in my opinion, the friction between the roller and saw blade and the weight of the saw are the decisive factors. I think metal is unsuitable because it can damage the saw teeth.
Ideas for improvement
Avoid loose parts. The construction should be just as simple as the original principle, but without loose parts that could get lost.
Suitable for thicker tools. The principle and the holder should also be suitable for other tools, such as slightly thicker western saws, folding rulers, or even broom handles.
Maintain clamping with round wood, as this requires only a small contact surface on the tool. This minimises the risk of anything sticking, the saw blade starting to rust due to contact or being damaged.
Saw holder with eccentric rollers
Many woodworkers use eccentric clamps for clamping (similar to panel support clamps). This principle is also very simple: an axis is positioned off-centre in a round or oval object. When the object is rotated, its distance to a second object increases or decreases. This principle can also be used on a saw holder.
First drill a blind hole approx. 10 mm deep and with the diameter of a screw head into the roller. In our example, the 4 x 35 wood screws have a head diameter of 10 mm. It is important that this hole is not in the centre of the roller, but offset towards the outside, in the example approx. 15 mm from the edge. Then, drill through with a drill bit of the screw's nominal diameter (4 mm).

Hier wird die Walze durch eine verdeckte Schraube gehalten, die außermittig montiert ist.
Now, screw the roller onto the base plate so that its own weight presses it against a vertical strip. A second, angled strip as a counterbearing is not necessary (= fewer parts). The blind hole can finally be sealed with a dowel rod of the appropriate diameter. The saw holder with an eccentric roller is complete.
Depending on the tool that is to be accommodated, this construction can now be varied. The more distance required between the roller and the strip, the larger the diameter of the roller should be. If a large distance is needed, the roller can be prevented from slipping through with an additional dowel rod when no tool is in the holder.

Tip: How to make rollers yourself
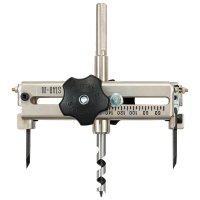
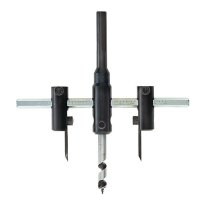
Round woods with a large diameter are sometimes hard to find. Suitable examples include blanks for solid wood table legs, which can be quite expensive. If you don't mind a hole in the centre of the roller, you can cut the rollers out of boards or sheet material with a hole saw cutter or, even better, with a circle cutter. With a circle cutter (e.g. Star-M® Quickly Adjustable Circle Cutter), you can cut out discs up to about 200 mm in diameter. With a dowel in the centre guide hole, these can then be stacked and glued together to form rollers of any thickness.
Improvements
Semicircular clamps. Since the roller must have quite a large diameter for greater distances, it requires correspondingly more space, and the distances between multiple holders become quite large. However, the principle also works with half-rods, i.e. rollers split down the middle. In this case, the hole is placed as close to a corner as possible, and the corners are slightly rounded. The rest of the assembly remains the same.
If more friction between the tool and roller is required, for example because the tool is very smooth or heavy, the roller can be fitted with slightly wider household rubber bands. This has the added advantage that the saw teeth do not touch the roller when the saw is hanging in the holder.

A semi-circular roller reduces the space required for this broom holder
Conclusion
YouTube, Instagram, and the like are great resources for tips, tricks, and tool hacks. Not all of them are useful, but many are really helpful. If you use these videos as inspiration and try things out and improve them where necessary, you can develop great ideas of your own. Have fun in the process!