For many people, Easter is a great occasion to decorate their home. With spring just around the corner, it’s even more enjoyable to bring some cheer into the home with colourful eggs, funny bunnies, and pretty bouquets. In this tutorial, we show you how to make three-dimensional Easter eggs from wood scraps, even if you’ve never turned or carved anything.
Material and tools
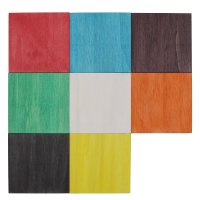
To start you’ll need wood scraps left over from other projects. Thicker boards and planks can be split with a band saw. You will need boards with a thickness of 10 mm and about 120 mm width (if you want to stick to the dimensions in our example). The length does not matter. The Easter eggs will be particularly varied if you use different types of wood in contrasting colours. For example, we used dark walnut and light-coloured lime. However, you can also use plywood or dye the wood with coloured stains afterwards.
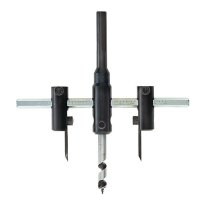
The most important tool for the »egg production« is a circle cutter. This specialised drill bit offers wide-ranging applications in the woodworking shop, including setting it to bore holes of varying diameters for outlets in wall panelling and other curved structures. We’re not drilling holes with it but cutting out round wooden discs!
You will also need a drilling machine, preferably a floor-standing or bench column drill press (e.g. DICTUM® Column Drill Press SB20/T), some sandpaper (or a belt disc sander, if available) and possibly dowel rods, ribbon or decorative cord.
Cutting discs with the circle cutter
The Easter eggs are composed of 10 mm thick wooden discs of various diameters. To determine the diameter of each disc, it's best to draw an egg of the desired size on a piece of paper and divide it into 10 mm sections vertically. You can then measure the diameter on this diagram using a ruler or set square. In our diagram (PDF available for download), we have outlined eggs in three different sizes for you. haben wir Eier in drei unterschiedlichen Größen für Sie skizziert.
Measure the size of each wooden disc on the diagram and adjust the inner diameter of the circle cutter accordingly. Please note: the measurements indicated on the scale of the circle cutter correspond to the outer diameter for circle cut-outs and boreholes. If you want to craft multiple Easter eggs, cut out a corresponding number of discs (plus some extras) before adjusting the circle cutter to a different diameter.

The prep. work: you need up to 15 discs per Easter egg
Tips for working with the circle cutter
Caution: the circle cutter has a large working radius, even when cutting smaller discs! Ensure your hands do not enter the path of the cutter arm. Use only a drill with adjustable speed and choose a low rpm. We have achieved good results with 600 to 800 rpm. Reduce the speed as the disc diameter increases. The wood should always rest against a stop or be securely clamped to ensure it remains stable if the circle cutter tilts. The two blades of the circle cutter do not have to be set to the exact same radius. The size of the discs is determined by the inward-facing blade that cuts the inner radius. However, the cuts of both blades should overlap to cleanly cut through the material. Make sure that the outer blade is not set too far inside, as it could then rub against the cut surface or the edge of the disc. The easiest way to check the settings is to drill slowly after setting and only »scratch« the wood surface at first. You can check the set dimensions by the scratch marks.
Assembling the discs
Arrange or stack the discs as you cut them so that they are in the correct order. This simplifies assembly. Sand the edges and surfaces of the discs and carefully chamfer or round the corners. Depending on the type of wood used, the edges might have more tears or fewer, which should definitely be sanded. This is easiest with a belt disc sander. Once all the discs are sanded (and possibly dyed), you can assemble the Easter eggs. Place the discs on a longer dowel rod and glue them in place with a little glue. This way, you can arrange the Easter eggs, for example, in a display with pretty branches or a lavish Easter bouquet. Or thread the wooden discs onto a decorative cord or colourful ribbon to hang them up. Have fun making and decorating!