Tools
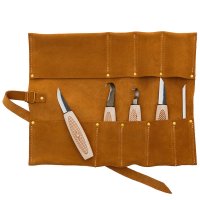
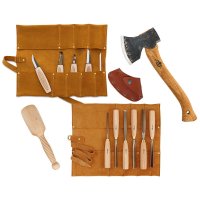
As a basic equipment we recommend the DICTUM® Carving and Hook Knives, 5-piece Set, incl. Leather Tool Roll, a coping saw (e.g. Japanese Coping Saw), scroll saw or bandsaw. You will need paper and a pencil to draw and transfer the pattern and sandpaper if you want to smooth the figure to finish.
Material
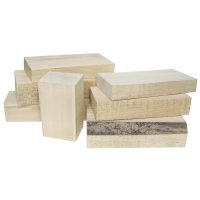
When new to carving, start with woods that are as soft as possible, where the earlywood and latewood of the growth rings have approximately the same hardness and thus offer consistent resistance when carving. These woods include Weymouth pine (pinus strobus), Swiss stone pine and limewood (e.g. Limewood, Offcuts, 7.5 kg). Limewood is the hardest of these three species, but in most cases also the most homogeneous wood. Other softwoods such as pine and spruce are not very homogeneous and show clear differences between earlywood and latewood. Hardwoods such as beech or maple have short fibres that can be carved well, but they require a lot of force to work with, which is why they are less suitable for beginners in the technique of »hand-held carving«.
An ideal material for practising and trying out the cutting technique is soap, as it is absolutely homogeneous. Blocks of hard soap have a convenient size and are easy to get. Like wood, soap tends to splinter if the cuts are made in the wrong direction. Unlike wax, soap does not gum up the carving tools. Carved objects made of soap also make unusual gifts.
Templates
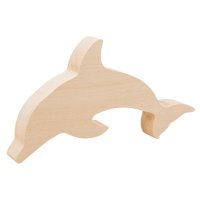
We have prepared two different bunny templates for you. The standing bunny is a little more difficult to carve than the crouching one because of its separate ears. If you want to start carving directly without having to draw and saw out the figure first, you can also work with ready-cut carving blanks (e.g. Carving Blank, Limewood, Dolphin).

Click on the image to download the templates as PDFs (German version)
Pay attention to the grain direction
Wood consists of many, more or less parallel running fibres. When cutting in the direction of the fibres, the individual chips can be easily taken off or split from the fibre composite. When cutting across the fibres, they have to be cut in their cross-section, which requires considerably more force. Since the wood fibres are more easily taken off the composite in the longitudinal direction than they are cut through, unsupported wood fibres tear out towards the edge of the workpiece.
Cutting with the grain:
When working out recesses, always cut with the grain in depth. Never cut outwards, otherwise the fibres will splinter away, especially with long-fibred woods (fir, spruce, ash, etc.). It does not matter whether it is a gently rounded or V-shaped indentation. At the point where the cuts meet, there is usually a rough surface with loose fibres. The best way to remove these is to make cuts across the grain to smooth the surface.

To prevent the wood fibres from breaking away, always cut with the grain
Stop cuts:
We recommend you make stop cuts to prevent the wood fibres from tearing or splitting too far. These cuts are usually pressed into the wood at right angles or at a steep angle to the surface if, for example, long cuts are to end abruptly at one point. Make the stop cut before you set the long cut.

A stop cut is used to cut through the wood fibre so that it does not tear.
Cutting techniques
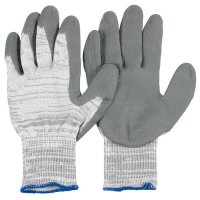
»Hand-held or in-hand carving« means that the workpiece is not clamped but held with one hand. The »holding hand« is always behind the knife or cutting edge or is protected from cuts by the workpiece. The hand guiding the knife (»cutting hand«) is usually behind the cutting edge anyway, only the thumb is at risk with some cutting techniques. You can wrap it with two or three layers of plaster as a precaution. If you want to be on the safe side, use Cut-Resistant Gloves. Important: Always make all rough cuts with large material removal away from the body! Only make controlled cuts with thin chips in the direction of the body.
Rough, long cuts:
The holding hand grasps the piece of wood behind the starting point of the cut. The force of the »cutting arm« guides the cut away from the body and the blade leaves the material on the other side. If you apply a lot of force, these cuts are difficult to control or stop. Caution: Take care of your legs or thighs if you carve sitting down but not at a table.

Push cuts:
The thumb of the holding hand serves as a support for the back of the knife with this cutting technique. The handle of the carving knife is pulled back in an arc-shaped movement, and the cutting edge penetrates the material in a controlled manner. Alternatively, for short cuts, the thumb of the holding hand can push the blade into the material. This technique is suitable for the controlled elaboration of details.

Push cuts:
This technique is reminiscent of peeling an apple. The carving knife is held with the fingers of the cutting hand. The thumb of the cutting hand serves as an abutment on the wood. Closing the hand pushes the blade towards the thumb. The cutting movement should end above the thumb. For short cuts with thin shavings, you can also cut towards or against the thumb, as the pressure can be controlled very well.

When working out details, there is a constant change between push and paring cuts, with the knife turning in the cutting hand. This allows you to cut the fibres in both directions without having to constantly rotate the workpiece.
Working out the shape
When carving a figure, rough shaping is the first step, i.e. the excess material is roughly removed. Create surfaces and facets, curves will be made later. Facets make it easier to check whether, for example, both halves of the figure are symmetrical. Remember that carving is purely »subtractive shaping« and you can only remove material, not add it again.
Once the rough shape has been worked out, it's time to get down to the details. Here too, create small surfaces and facets as a first step, it will help you to compare and control the shapes. It is only at the end that we will refine and round off all sharp edges. Most of the time, it is sufficient to sand the figure to give it a softer appearance and remove the facets. A faceted figure can be even more expressive and definitely has its charm - try both.

The light refracts on surfaces and facets, so the shapes are easily verifiable
Work steps
- Drawing the contours
Transfer the contours of the template onto a suitable piece of wood. The easiest way to do this is to cut out the paper template, place it on the piece of wood and trace the contours with a soft pencil. A somewhat thicker paper (120 g) makes it easier to trace through. - Sawing out the contours with a coping saw, bandsaw etc. You can cut out the contours or the rough outlines with a coping or Japanese saw, bandsaw or scroll saw to avoid having to carve the entire figure out of the wooden block.
- Rough shaping
The body of the bunny should become narrower towards the back. The head also becomes narrower towards the bridge of the nose. The thighs are slightly forward, the forelegs should point inwards. The rabbit's ears are given a spoon-like shape. Gradually feel your way towards the shape. - Re-drawing details
To keep track of where material should be left and where material needs to be removed, keep drawing on details that have been removed by a cut. Hatch areas and surfaces where wood still needs to be removed. This allows you to see the visual effect of indentations before the material is removed. - Working out details
Pay particular attention to the grain and a clean cut when carving the details. Working out the fine details may turn out to be especially tricky with the wood fibres tending to chip. Work with little force and sharp knives. If necessary, sharpen your carving tools in between. How detailed you work out the figure is up to you. Some figures already impress in rough shape, others only begin to live through many details. - Smoothing facets and sanding the figure
Finally, you should finish all surfaces with fine cuts to remove pencil marks and handprints. If you want the figure to have a soft flowing shape, you can carefully sand all the corners and edges. For larger objects, you can also refinish them with Rifflers.