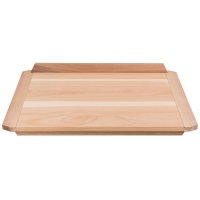
Material and dimensions
You can vary the dimensions and the material for the board according to your preferences. We have used local cherry and walnut for our baking boards. The board itself measures 475 × 680 mm and is 19 mm thick. The stop battens have a cross-section of approx. 15 × 45 mm (if they are dowelled on with “Dominos”, 15 × 40 mm is enough).

Here you can download a PDF with a list of dimensions and materials
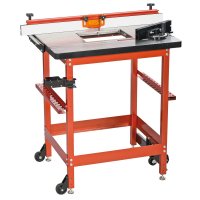
Tools and machines
Depending on which production variant you choose, you will need a router table or an under-table router and a suitable burr cutter or a router with groove cutters and a Festool DF 500 Domino dowel router in addition to normal basic tooling. All the joints shown can also be made completely or partially by hand. In this case you do not need any special machines or templates.
Variant 1: Baking board with sliding dovetails only
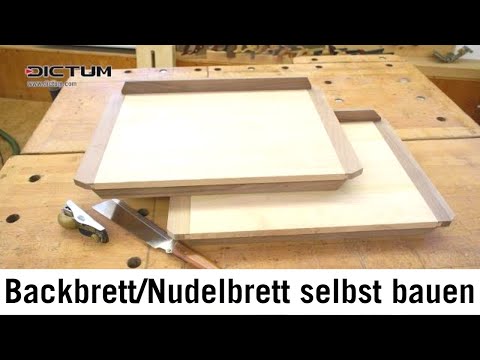
In this variant, the pasta board is only joined by sliding dovetails, which we produce on the router table. Always pay attention to your safety when working on machines, wear ear protection and safety goggles and use a suitable extraction system.
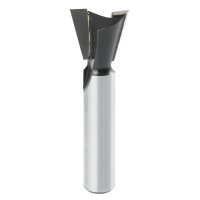
To mill the dovetail-shaped rabbetin the two cross strips, set the fence so that the dovetail-shaped rabbet runs exactly in the centre of the strips. Ideally, the bottom of the dovetail-shaped rabbet should not be wider than 2/3 of the material thickness, which corresponds to approx. 12 mm to 19 mm in the example. A pressure comb ensures secure guidance at the stopper.
The fence is then changed over for milling the burr springs. Reduce the cutting depth slightly so that the burr spring does not touch the bottom of the groove.

Sliding Dovetails hold this pasta board
The two stop bars connect to the board using burrs. For this purpose, cut a burr groove into the board surface parallel to a longitudinal edge at a distance of approx. 20 mm (alternatively, this can also be done with a router with a parallel fence). The cutting depth is about one third to max. half the thickness of the material. Similar to the end sides of the board surface, you now mill a burr spring on each of the two stop bars.
To be able to assemble the backboard, you have to set the burr springs at both ends of the stop bars to the length of the board, in our case approx. 30 mm each. To do this, mark the protrusion, cut it roughly with a saw and clean the cut surfaces with a sharp chisel. Cut the ends of the stop bars to 45°, and then clean and sand everything. When assembling, the first thing to do is to push the stop bars into the grooves. They should fit tightly and can be pushed in with moderate force. Secure the stop bars at one point only with a few drops of adhesive. Make sure that the stop bars are in the right position so that you can push the cross strips in completely. Since cross-wood is joined to longitudinal wood here, the joint does not slide together as easily as with the stop strips. Therefore, break all edges carefully, also on the burr spring. Again, secure the joint with just a few drops of glue to allow the wood to work.
Variant 2: Traditional wedge and groove joint
In the second variant, we use a tongue-and-groove joint for the cross strips that is often found in traditional baking boards. In this case, the cross strips are not glued, but only the tenon is wedged. This allows the cross-wood to work freely, and the board surface is kept in shape by the cross strips.
For this joint we use two routing templates in our video tutorial video tutorial, one for flattening the spring and tenon and one for setting down the tenon. These templates come from our “Advanced Woodworking Course”. You can just as well use a circular bench saw to cut the flattening and set down the tenon by hand.

Traditionally, many baking boards were joined by wedge tenons
First, flatten the board surface at both ends and set the tenon down. Then clean out the corners of the tenon and round it off so that it fits into the milled slot later. Now saw two slots for the wedges at a slight angle into the tenon.
Now cut grooves in both cross strips to fit the spring (in our example approx. 8 mm wide and 10 mm deep). The position of the tenon (centre) is marked on the lasts. If you want to mill the slots with a dowel milling machine, it is best to make two additional marks for a total of three milling processes. Milling is done in three processes. First cut a groove in the middle, then offset once to the right and once to the left. Start routing on the side of the groove, so you can adjust the routing position exactly to the groove. An additional last behind the workpiece helps to keep the cutter exactly level. As the “domino cutter” is not long enough, you have to rout through from the opposite side in three routing processes, again.
You can also use “domino dowels” as a joint for the stop strips. This is not traditional, but it is quicker than burr strips. Since here lengthwise wood is joined with lengthwise wood, you can also glue the joint later without any problems. Three to four “domino dowels” spread across the width of the board are quite sufficient.
Now you can assemble the board. Put the cross strips over the tenons and the groove on the board and wedge the tenon with small wedges. Then cut the tenons flush and plaster them. You can now set the ends of the cross strips at an angle and also plaster and sand them.
Before you dowel on both stop strips, you should pre-sand the strips and the surfaces of the backboard. As this is a purely lengthwise wood joint, you can glue the stop strips along their entire length. When the glue is tightened, all edges of this board are also need to be broken and everything carefully plastered and sanded.
The variants explained in this tutorial are only two possibilities. No matter which variant you choose, we hope you have fun making it, giving it as a gift and baking with it.

This is how baking makes fun!