An advent calendar is the perfect way to get into the Christmas spirit. For our project, you'll only need a few leftover pieces of thick wood, a quality bandsaw with a scrolling blade, and a bit of time. In return, you'll have an advent calendar that will bring joy to you and your loved ones for many years.
What You Need for the Advent Calendar
If you want to recreate the calendar as we did in our video (german), you'll need the following (all dimensions are approximate):
Materials:
2 x timber, 340 x 140 x 55 mm
1 x timber, 340 x 60 x 55 mm
Wood glue (e.g., Bindan BB)
Optional: stick-on numbers, surface treatment
Note that the length of the wood must not exceed the cutting width of your bandsaw, otherwise, you won't be able to make the curve cuts correctly.
Tools:
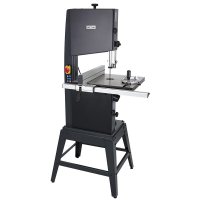
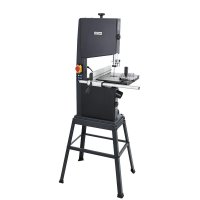
Bandsaw (e.g., DICTUM BS 320-12)
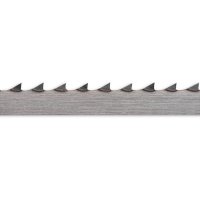
with a narrow saw blade (scrolling saw blade)
several small clamps
sandpaper or sanding sponge
optional: a (stationary) router with a rounding bit (small radius e.g., R3)
orbital or random orbit sander
Alternatively, you can also work the edges and surfaces with manual sanding tools.
Time Investment:
Since you need to make a total of 24 small drawers for an advent calendar, the steps will be repeated several times. It's a bit of a task and will take about two days, so the advent calendar is an ideal weekend project.
Design of the Advent Calendar
Our advent calendar is just a suggestion for you to follow. Be creative and design your own advent calendar. We chose a Christmas tree as a festive motif, but you can also opt for a wooden train, houses of a small village, or a group of snowmen, for example.
First, create a full-size draft drawing. Choose the radii of the drawer cutouts not too tight. Depending on the width of the saw blade, only certain radii are possible. For a saw blade about 6 mm wide, the radius should be at least 13 mm (which corresponds to about a 2-Euro coin).
Also, think about the cutting path when designing. Where can each cut be started and ended? Then transfer your design or drawings onto the material and mark the path of the cut with arrows, so that you keep your orientation while working on the bandsaw.

Design of our advent calendar on graph paper
Making Bandsaw Boxes
The process for making so-called Bandsaw Boxes (bandsaw drawers) is always the same; the steps are repeated several times. With 24 boxes, you'll need some patience. Work calmly and slowly, otherwise, the curve cuts won't come out right.
Note: We assume that you are experienced in using your bandsaw. Always pay attention to your safety! In particular, adjust the upper saw blade guide including the cover so that the saw blade is only exposed in the required area (depending on the thickness of the material). Carefully set up your bandsaw. For clean curve cuts, a narrow, well-set saw blade with the appropriate tension and a precisely adjusted blade guide are necessary.
1. Cut out the contour
First, saw out the contour of the object (in our example, the three parts of the tree). This can initially be done roughly and refined later.
2. Cut out the drawers
Now, the markings for the cutting path come into play. If you have planned all the cuts in advance, you can now work through them quickly one after the other. Advance the workpiece slowly while sawing. With thicker material, the saw blade needs more time to cut through the wood and remove the sawdust from the cut. Especially with curve cuts, you work almost in place. Caution: the saw blade must not jam or bend (risk of breaking). Be careful when pulling the workpiece back, so you don't pull the saw blade along and make it jump out of the guide. Stop the bandsaw as soon as you have returned to the beginning of a cutout. Push the upper saw blade guide up, remove the cut-out block and thread the saw blade through the existing cut. Then reset the blade guide down and continue with the cutting out of the drawers.

For curve cuts on the bandsaw, advance very slowly
Important: Mark all the blocks with a number on the front, back, and bottom so that you can later assign them to the correct cutout in the correct orientation.
3. Glue the cuts
Before you continue with the drawers, you can glue the cuts on the body so that they are hardly visible later. We only glued the lower cuts on our tree, leaving the side ones as they were.
4. Separate front and back pieces
Now, saw off the front and back sides of the later drawers from the 24 blocks, about 5 to 6 mm thick. Use a push block with appropriate cutouts for this, and if possible, lay the bandsaw's rip fence flat to safely guide the small parts. Two different width cutouts on the push block are necessary, one in the full material thickness, another in the width of the parts with the front or back already separated.

A push block can also be used to safely guide small parts
5. Cut out the drawer interiors
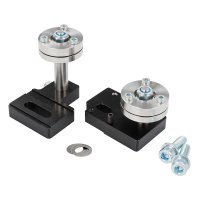
Draw an inner cutout on all the drawer middle pieces, leaving about 5 mm of material on the left, right, and bottom. Caution: do not lead the small parts by the saw blade with your bare hand, it's very dangerous! Clamp the blocks for cutting out in a clamp (e.g., Piher One-Hand Clamp Mini Quick), with which you can safely guide the parts and maintain a sufficient distance from the saw blade. Remove the falling-out sections with a push stick, not with your fingers!

A clamp holds the small parts and provides a distance from the saw blade
6. Glue the drawers
Before you glue the front and back pieces back onto the drawers, remove loose fibers on the edges, for example, with a sanding sponge. Do not apply too much glue to the edges, the drawers will not be subjected to heavy loads and squeezed-out glue must be removed with difficulty.
7. Round off the edges
It doesn't look very nice if the edges of the drawers and cutouts remain sharp, as irregularities then become very noticeable. Round off the edges well. We used a router or an improvised router table and a 3 mm rounding bit for this. However, you can also perform this step with manual sanding tools or an orbital or random orbit sander.
8. Surface and decoration
Finally, you can give your advent calendar a creative surface treatment. You can paint it, stain it, or just oil it. And of course, an advent calendar needs numbers. You can apply them before the surface treatment, e.g., with a pyrography tool (e.g., Sorby Peter Child Pyrography Machine) or the Pyrography Art Pen, or paint or stick them on afterward. Self-adhesive numbers, especially for advent calendars, can be found in drugstores or stationery stores in the craft supplies section.