What are wood joints used for?
Connection. Wood joints are intended to connect several sections or workpieces and secure them in the desired position. This certainly applies to all fixed connections. There are also movable and detachable joints, but these shall not be part of this exploration.
Transmission of force. These joints are designed to transmit and distribute the forces that occur (compressive, tensile and shearing forces, etc.) to all parts, so that the workpiece or joint can withstand the loads. The principle is: the load-bearing capacity of a wood joint must always be greater than the load.
Enlargement of the glueing surface. Glue plays a significant role in the transmission of force. Even with butt joints, it ensures the force is transmitted from one workpiece to the other. To make the most of this property, many wood joints are designed to increase the glueing surface. We have covered this topic in detail in our Glueing Primer.Adhesive Primer
Wood joints grouped by function
Wood joints can be divided into three groups based on the function they perform.
Widening. The joints are used to create a wider surface from several narrow sections by placing them parallel to each other. We do this, for example, whenever a large board is created from several solid wood strips in order to minimise warping of the wood.
Lenghtening. When a longer workpiece is assembled using two or more short battens or beams. This is rarely required in carpentry. Europe is a densely forested region and wood of sufficient length is usually available to us. It’s a different matter on the Japanese islands, for example, where wood was a scarce resource, and every short piece of wood was used if possible. For this reason, a variety of wood joints have been developed in Japan with the specific aim of lengthening a workpiece.
Framing and housing For this, we use corner joints, which are probably the most common type of connection. Whenever two workpieces are joined at an angle, we call it a »corner joint«. These joints can be further divided according to the construction of the piece of furniture, which we will look at in more detail below.
When people speak of corner joints, they generally mean connections where two pieces meet at a right angle at one end, resulting in one single internal angle. However, the following subcategories are also classed as corner joints:
T-joints. With these, one workpiece meets the other in the middle, rather than at the end, resulting in two internal angles.
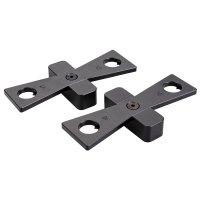
Cross joints. Here, the two workpieces overlap and cross each other, creating four internal angles.
Oblique joints. With oblique joints, the parts do not meet at right angles, i.e. not at a 90° angle.

Corner joints can be divided into further subcategories
Subdivision of corner joints according to construction method
A piece of furniture will generally combine several types of joint. For example, a different type of joint will be used for the body than for the door. In frame construction, frame corner joints include the subcategories T-joints and cross joints. Examples are mortise and tenon and cross lap joints. When working with boards and panels, there is a greater range of options, such as dovetail and biscuit corner joints. Compared to simple frame construction, the workpieces, i.e. the boards and panels, offer a greater width to work with. In furniture such as chairs, where four corner posts support the entire piece of furniture, the techniques used for frame construction are often combined with more complex board and panel joints.
In general, it’s worth bearing in mind that the specific name of a wood joint also hints at how it is constructed.
What are the most important traditional wood joints?
Wood joints are a vast subject. It would go beyond the scope of this article to even begin to describe all the different joints. When we speak of traditional wood joints we mean the joints commonly used here in Europe, of which we would like to look at the most important ones, i.e. the joints that every carpenter learns about in his training. We have ordered the types of joint in accordance to their complexity. This is how our »Evolution of Wood Joints« was created. It shows the development of wood joints from the simple corner butt joint to the complex bevelled dovetail joint.
Butt joint. The connection is only maintained by glue or other connecting means (dowels, splines, etc.). Butt joints are not ideal for corners, since end-grain wood often meets edge-grain wood and therefore no durable joint is created through glueing. However, when positioned in parallel, with strips of wood glued to each other lengthwise, they are quite durable. Common examples of butt joints are glued wooden boards.
Mitre joints. Mitre joints are designed for use on corners. Here end-grain meets end-grain, or edge-grain lies against edge-grain, creating a continuous grain that offers better force distribution and a slightly larger glueing surface. But again, the connection is only maintained by glue or other means of binding the pieces together. Mitres are visually appealing, which is why many of the more complex joints are »mitred«.

Evolution of wood joints from simple to complex
Lap joints (angled, crossed). Lap joints significantly increase the glueing area, and edge-grain is joined to edge-grain. However, simple lap joints are not self-locking, i.e. lap joints can be separated in all directions. Cross-forming lap joints offer more support, as they can only be slid apart in one direction. Typical application examples for lap joints are muntin crosses or grilles on wooden windows.
Rabbet joints. Basically a lap joint in miniature, mostly found on longitudinal edges. Rabbets allow the wood to shrink and swell without a continuous gap being created. Examples of simple rabbet joints can be found in wood flooring and wall panels.
Tongue and groove joints. For this, a tongue is formed along the edge of a workpiece. The tongue slots into its counterpart, i.e. the groove on the other piece. Tongue and groove, like rabbets, are often used as loose joints to allow the wood to work. In contrast to the simple rabbet, the tongue and groove can only be moved in two directions. Examples are machine-made or hand-made corner joints.
Mortise and tenon joints. (blind, angled, double etc.). Basically, a mortise-and-tenon joint is an extended tongue with a correspondingly-sized groove. A simple corner joint with mortise and tenon can be disjoined in two directions. In contrast, a blind mortise and tenon, as a corner or T-joint, can only be separated in one direction. Compared to simple lap joints, a mortise-and-tenon joint enlarges the glueing area to twice its size. In order to further increase the glueing area on larger pieces of wood, multiple tenons are used. So the tenon isn’t made thicker (originally 1/3 of the overall wood thickness), instead the thickness is further divided (into 5 or 7 sections) to create double or triple tenons. This increases the glueing area enormously and the forces are better distributed over the workpieces.
We can also consider sliding dovetail joints (continuous, concealed...) as a further development of tongue and groove. The connection can no longer be pulled apart in an additional direction due to the wedge-shaped tongue. Correctly manufactured (slightly wedge-shaped), the sliding joint forms a form-fit and force-fit connection that does not need to be glued. Sliding joints are usually made as T-joints, rarely as corner joints. These types of joints are often found on table tops and old doors, where they prevent the wide wood surfaces from warping.
Mortise and tenon joints (box joints, dovetail joints, etc.) are a very varied group of wood joints. The simplest form is the so-called box or finger joint, which basically consists of many small slots and pegs and thus provides a very large glueing surface. Often used and very popular as a decorative wooden joint are fingers in the shape of dovetails. Just like sliding joints, dovetails can’t be pulled apart in more than one direction due to their wedge shape. There are many different variants such as dovetail half-lap joints, mitred dovetail joints, bevelled dovetails and interesting special shapes such as Japanese »sunrise dovetails«.
Dowels and splines. Historically, wooden connecting elements were used to additionally secure simple wooden joints. Wooden nails and dowels have been known since ancient times. The insertion of thin wooden plates for joining, so-called or loose pegs, also has a long tradition. Modern variants are grooved dowels and so-called biscuits (Lamello, Domino).