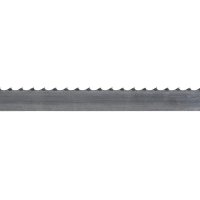
The band saw is one of the most popular stationary machines in the woodworking shop. It is versatile and expands the manufacturing possibilities enormously. Compared to other machines, a band saw requires more maintenance in at least one respect. If the band saw has not been used for a long time and at the latest after changing the saw blade, its band guide needs to be readjusted. We explain how to change the saw blade on a band saw and give you tips on how to set the band saw correctly again afterwards.
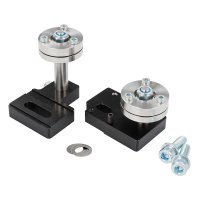
Three-roller saw blade guide
The band saw blade is usually supported by two guides, one fixed under the work table and one on the upper cover, which is adjustable in height. The band guide supports the band saw blade whenever it threatens to run off track. Otherwise, a correctly adjusted saw blade guide allows the band saw blade to run freely without permanent contact. There are different forms of saw blade guides for band saws. A simple form is the guide with lateral sliding pins and a ball bearing behind the band saw blade. This sliding pin guide is usually found on smaller band saws. The most commonly used guide is the so-called three-roller saw blade guide, where the band saw blade is also guided laterally by ball bearings. With a roller guide, the rolling resistance of the ball bearings is significantly lower than the frictional resistance of guide pins. As a result, the band saw blade heats up less and expands less. The guide rollers can therefore be adjusted closer to the band saw blade. In this article we explain how to adjust the three-roller band guide. However, adjusting a sliding pin guide works similarly.
There are numerous special forms. For example, there is a precision band guide for the DICTUM Bandsaw BS 270-10 and BS 320-12, which allows precise saw cuts with very narrow band saw blades. In our video instructions we show, among other things, how it is mounted and adjusted.
How to change the band saw blade on a band saw?
First, disconnect the machine from the mains, remove all stops and open the doors. All safety covers that could block the saw blade and the table insert in the work table are removed. The band guide is loosened and pushed back a little, if possible. The band saw blade is then released by loosening the handwheel for band tension. On some models, for example the DICTUM BS 360-14, the saw can be released by a lever.
Now you can carefully remove the band saw blade from the rollers and unthread it from the saw blade guide and cover. Make sure that the band saw blade is not bent too much or even kinked in the process. Then thread the new band saw blade back in the opposite way and place it loosely on the upper and lower rollers. Sometimes the tension on the handwheel has to be loosened a little.
Place the new saw blade approximately centrally on the rollers. The saw teeth do not need to protrude over the rubber bands at the front, as is sometimes assumed. Now slightly pre-tension the band saw blade again by turning the hand wheel. The band tension depends on the width of the band saw blade. Wider band saw blades can be tensioned more than narrow ones.
What to do if the band saw blade jumps off the rollers?
The inclination of the roller is usually adjusted with a handwheel on the back of the bandsaw.
Loosen the lock nut on the handwheel so that you can adjust the inclination. To adjust the run of the band saw blade, turn the upper roller slowly with one hand. The saw blade should run as centrally as possible on the roller. If the saw blade tends to run backwards, the roller must be tilted slightly forwards (B). If the band runs forward and threatens to jump off the roller, the upper roller must be tilted backwards (A). If the band saw blade runs centrally on the roller even after several revolutions, you can fix the setting on the handwheel with the lock nut.

The saw blade is aligned by tilting the upper roller.
How to adjust the band guide on a band saw?
To get optimal cutting results later on, adjust the saw blade cover and thus also the upper band guide approximately to the later working height. First, adjust the rear guide roller on the upper guide so that it sits just behind the saw blade. The saw blade should not touch the guide rollers when not under load (when not sawing). The rear roller should support the saw blade and prevent the saw blade from being pushed backwards by the workpiece being fed too far.

Schematic drawing of the upper three roller guide
To get optimal cutting results later on, adjust the saw blade cover and thus also the upper band guide approximately to the later working height. First, adjust the rear guide roller on the upper guide so that it sits just behind the saw blade. The saw blade should not touch the guide rollers when not under load (when not sawing). The rear roller should support the saw blade and prevent the saw blade from being pushed backwards by the workpiece being fed too far.
When the upper roller guide is adjusted, you can adjust the lower guide rollers in the same way. Again, first place the rear guide roller close to the back of the band saw blade and then align the side guide rollers with a minimum distance on the band saw blade. As before, the rollers only rotate occasionally.
Before a first test run, all safety covers are refitted and the table inserts are inserted. For the test run, the band saw is only switched on briefly and then switched off again directly. If the band saw blade jumps off the rollers, the machine is already stopped. If there is nothing amiss and the replaced band saw blade runs smoothly, you can make a test cut. If this is also successful, you can continue working on your band saw.
Common faults and possible causes and solutions
What to do if the saw cut is not square?
Maybe the work table is slightly tilted. Use an angle to check whether the worktable is at right angles to the band saw blade and correct the setting.
Too little tension on the band saw blade can also cause the saw cut to run. Then increase the band tension on the upper handwheel.
What to do if the saw blade jumps off the rollers despite correct settings?
If you have adjusted the inclination of the upper roller correctly, this should not happen. Check whether the rubber bandages of the track rollers are dirty or heavily worn. Clean dirty bandages or replace worn or damaged rubber bandages.
It often happens that the saw blade is pulled forward out of the guide when the workpiece is pulled back. If this cannot be avoided, always pull the workpiece back slowly and make sure that the saw blade remains in the guide.
What to do if the band saw makes unusual noises?
Regular noises, such as clattering or banging, can have several causes. On the one hand, it can be due to an imbalance. Sometimes chips and dust fall onto a track roller (usually the lower one) when changing the saw blade and remain between the spokes or on the inner rim. Check and clean the rollers.
Beating noises at slightly longer intervals are usually caused by a damaged or kinked saw blade. Check the saw blade over its entire length and replace it if necessary.
What to do if the band saw does not start after changing the band saw blade?
Check whether the mains plug is plugged in. If this is the case, it is usually due to the safety contact switches that stop the band saw as soon as one of the doors is opened. Check that all doors are firmly closed and that the safety contact switches are working correctly.