After a completed project, there are often some leftover stains, lacquers or glue mixtures that could be used later. And just as often, these paints or adhesives are unusable when you come to use them again. To help you avoid this in the future, we've compiled the following 10 tips for proper storage of paints, varnishes, and adhesives:
1. Shop cleverly
As early as the project planning stage, you can ensure that you won’t have much leftover paint or varnish remaining. Calculate the surface to be treated and purchase only the necessary amount. Most surface materials' packaging indicates exact consumption per square metre.
2. Mix it yourself
Pre-mixed paints generally have a shorter shelf life compared to individual, pure components. Many waxes, oils, and pigments can be used for several years when kept unmixed. This is particularly true for varnishes and adhesives offered as two-component systems (resin and hardener). Always mix only as much as you actually need. At DICTUM, for example, you can obtain all the components for mixing linseed oil paints and milk paints as well as oils and waxes in various container sizes. The respective recipes for mixing paints and surface agents can be found in our free Finishing Primer.

3. Ensure cleanliness right from the start
Start paying attention to cleanliness even during processing. Most dispersion paints or water-soluble paints and glues do not contain any preservatives, which means that their shelf life continuously decreases after opening the container. The use of dirty brushes or paint rollers can further the introduction of bacteria and germs into the dispersion, gradually breaking down its components. Initially, the binders are affected, followed by the pigments. As a result, paints first lose their application properties like spreadability and adhesion, and later, the colour shade may change. In the case of self-mixed protein-based adhesives, such as bone and hide glue, microorganisms or spores can cause glue residues to quickly start developing mould.
Tip: make sure to clean even a new brush or paint roller before using it. A freshly cleaned, slightly damp brush absorbs less paint or glue and is easier to clean afterwards!
4. Store in a cool and dry place
It is almost always mentioned on the packaging: »Store in a cool and dry place.« But what exactly does that mean? Most paints, varnishes and glues can be safely stored at a consistent room temperature of 15 to 20 °C. Cellar rooms are ideal for this purpose since they tend to remain cool even during the summer. If you do not have a cool room, you can store paints and glues in a refrigerator. It doesn't need to be switched on, as long as the insulation of the fridge keeps temperatures consistently below 20 °C. Cyanoacrylate adhesives, commonly known as superglue, in particular have a significantly longer shelf life at lower temperatures. Pre-mixed two-component adhesives also benefit from refrigerated storage at around 7°C, as the lower temperatures reduce their reactivity. Leftover self-mixed bone and hide glues can be stored in the refrigerator for a few days. These gluten glues are to be treated like food; they basically consist of gelatine. After a few days, however, bone glue starts to mould even in the refrigerator. The shelf life of protein-based glues can be extended by adding a little citric acid. Be careful with normal wood glue or white glue! These are dispersions that do not tolerate cold well. Depending on the brand and manufacturer, they lose their adhesive strength at temperatures below 5 to 10 °C. We have already created a blog post on this topic: Heat your workshop! (https://www.dictum.com/de/blog/tipps-tricks/kalte-werkstatt-bitte-heizen)
5. Lights off, air out
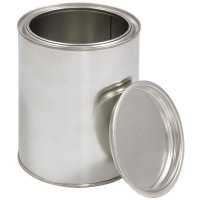
Many paints, varnishes, oils and glues require air and/or light for curing or hardening. With dispersions, the water evaporates into the air or is absorbed by the wood. Instant adhesives and PU glues react with moisture in the air or in the wood. Linseed oil paints only cure or polymerise completely with sufficient UV light and air supply. When storing these materials, it is advantageous to transfer leftovers into a light and airtight container. Ideal options include lever lid cans. These are easy to fill, seal airtight, and block out light, and they come in various sizes.
Caution: You surely have heard of the tip to store the cans upside down to prevent air from entering the container. However, in doing so, it can happen that the can is not entirely airtight, or some paint adheres to the edge of the lid, resulting in the lid sticking to the shelf once the paint has dried. And when you lift the can, the contents spill over the shelf onto the floor... If you choose to follow this tip, always place a piece of cardboard or, preferably, a small tray under the can (newspaper is too thin). If any paint leaks, you can flip everything, including the piece of cardboard or tray, and then safely open the can. An easier alternative is to cover the paint with water or a solvent. The layer of water or solvent prevents the formation of a skin and can be poured off or stirred in before the next use.
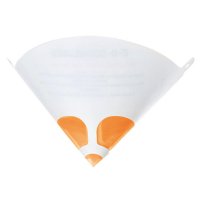
If a skin has formed, check its thickness. You can carefully remove a thin skin with a chopstick and then pour the paint through a disposable sieve or a thin nylon stocking into another container.

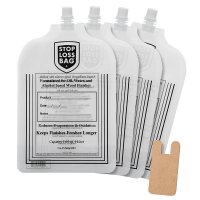
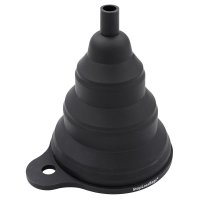
If you want to almost completely avoid trapping air, store your oils and paints in StopLossBags. These bags prevent the formation of a skin since the air is simply pressed out of the bag after filling. The StopLossBags are filled with a suitable funnel, which fits perfectly on many cans, ensuring nothing spills over.
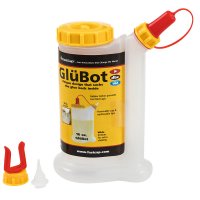
There are practical glue dispensers for wood glues. Traditional white glues are dispersion glues that cure through evaporation. Many glue dispensers therefore have a larger storage container and only a relatively small opening for processing, minimizing evaporation. With the GluBot glue bottle, for example, the glue stands in a thin tube and can be dispensed by pressing on the reservoir.
The classic TS-Boy Thrifty Glue Container also works on this principle, featuring an airtight glue container. It has a small glue tray for the brush, which can be sealed with a cap to prevent the glue or water from evaporating.
Superglue and PU glue as well as any adhesives that react with humidity, cannot be simply poured from one container to another. When transferring, they would come into contact with a lot of air humidity and thus become unusable. After use, it is best to squeeze as much air as possible out of the bottle and close everything tightly.
6. Select a suitable container and seal
In addition to the container's size, the material from which it is made plays a crucial role. Some lacquers and glues react to metal, while others may corrode plastic. For example, when glueing tannin-rich woods, dark stains can occur if the glue comes into contact with metal. For glue brushes, we therefore recommend using a cord-bound ferrule instead of a metal one to avoid potential reactions. Shellac also reacts to metals and should therefore be stored in plastic containers or pharmacist's bottles with glass caps.
7. Pay attention to safety
While the German occupational health & safety regulations only apply to professionals, it may be a good idea as a hobbyist to also only use shatterproof and sealed containers for storing finishing agents - i.e. no jam jars. The aforementioned containers, cans and bags are ideal for this purpose.
Never transfer and store coating materials, solvents, or adhesives in containers meant for food. This can be fatal! Always keep adhesives, paints and varnishes out of the reach of children!

In this context, also pay attention to the hazardous substance labels on the packaging. Empty or partially emptied containers of flammable paints or solvents almost always contain explosive gas mixtures. So, when pouring and working with them, avoid smoking or handling fire, and ensure adequate ventilation at all times.
8. Label the contents
Always make sure to label the container with the substance it holds (dispersion paint, stain, glue, etc.), if applicable, the colour shade, its intended use, and the date. This way you can easily fall back on the matching paint/adhesive for repairs or other projects. Without proper labelling, identifying the contents can become challenging after a few months, especially if you have saved several leftovers.
9. Consider expiry dates
In general, water-soluble paints and varnishes tend to have a longer shelf life compared to solvent-based ones. On ready-to-use paints, varnishes or glues, the manufacturer usually indicates a best-before date or period. At DICTUM, for example, we state that glues can be used for at least 6 or 12 months after purchase, depending on the type and manufacturer. Like the expiry date on food items, which are often still safe to consume for some time after the date has passed, the properties of glues and paints also gradually change after the expiration date. Typically, adhesion is the first characteristic to deteriorate. The paint or glue still looks normal, but no longer adheres properly to the surface or fails to harden completely. Spoiled paints and glues can be quickly identified by their odour. If a paint or glue has a strange, sour or rotten smell, it must be disposed of. Even adding new solvent or binder will not make the spoiled ingredients usable again.

10. Proper disposal
Dried-up paints, varnishes and glues can usually be disposed of with household waste. However, it's a different story when it comes to leftovers that are still liquid. These must be taken to the recycling centre for hazardous waste disposal. Even small amounts should not be simply flushed down the drain, as paints, varnishes, and adhesives can cause pipes or traps to become clogged. Additionally, some paints and solvents can pose real problems for sewage treatment plants. Therefore, it's best to spread small remaining amounts of paints and varnishes on a piece of wood or cardboard and let them dry. Afterwards, you can dispose of the dried residues in the household waste. Always remember to follow the manufacturer's disposal guidelines!